

16 Clever DIY Garden Decor Ideas to Personalize Your Outdoor Space
A garden can feel more personal with a few handmade details, and you don’t need a large budget or a workshop full of tools to get started. These DIY garden decor ideas turn everyday finds, natural materials, and simple craft supplies into useful markers, playful accents, and plant displays.
Some projects add color or sparkle, while others help organize herbs, light a pathway, or give climbing plants support. Choose ideas that suit your garden’s size, the weather in your area, and the materials you already have on hand.
These projects are for gardeners who enjoy a little creative reuse, whether you have a spacious backyard, a small patio, or just a sunny doorstep. Start with one idea, take your time with outdoor-safe finishes and secure installations, and let your garden grow around the finished piece.
Quick Answer
The best DIY garden decor ideas are painted rock plant markers, a teacup bird feeder, a mosaic gazing ball, upcycled plate flowers and a tilted tiered herb planter. You can also make a silverware wind chime, painted concrete mushrooms, mason jar solar lights, a ladder plant stand, chandelier crystals for a tree, a painted tire planter, a log stump planter, a bottle tree, a fairy garden, a colander planter and a twig trellis.
1. Paint Colorful Garden Rock Markers
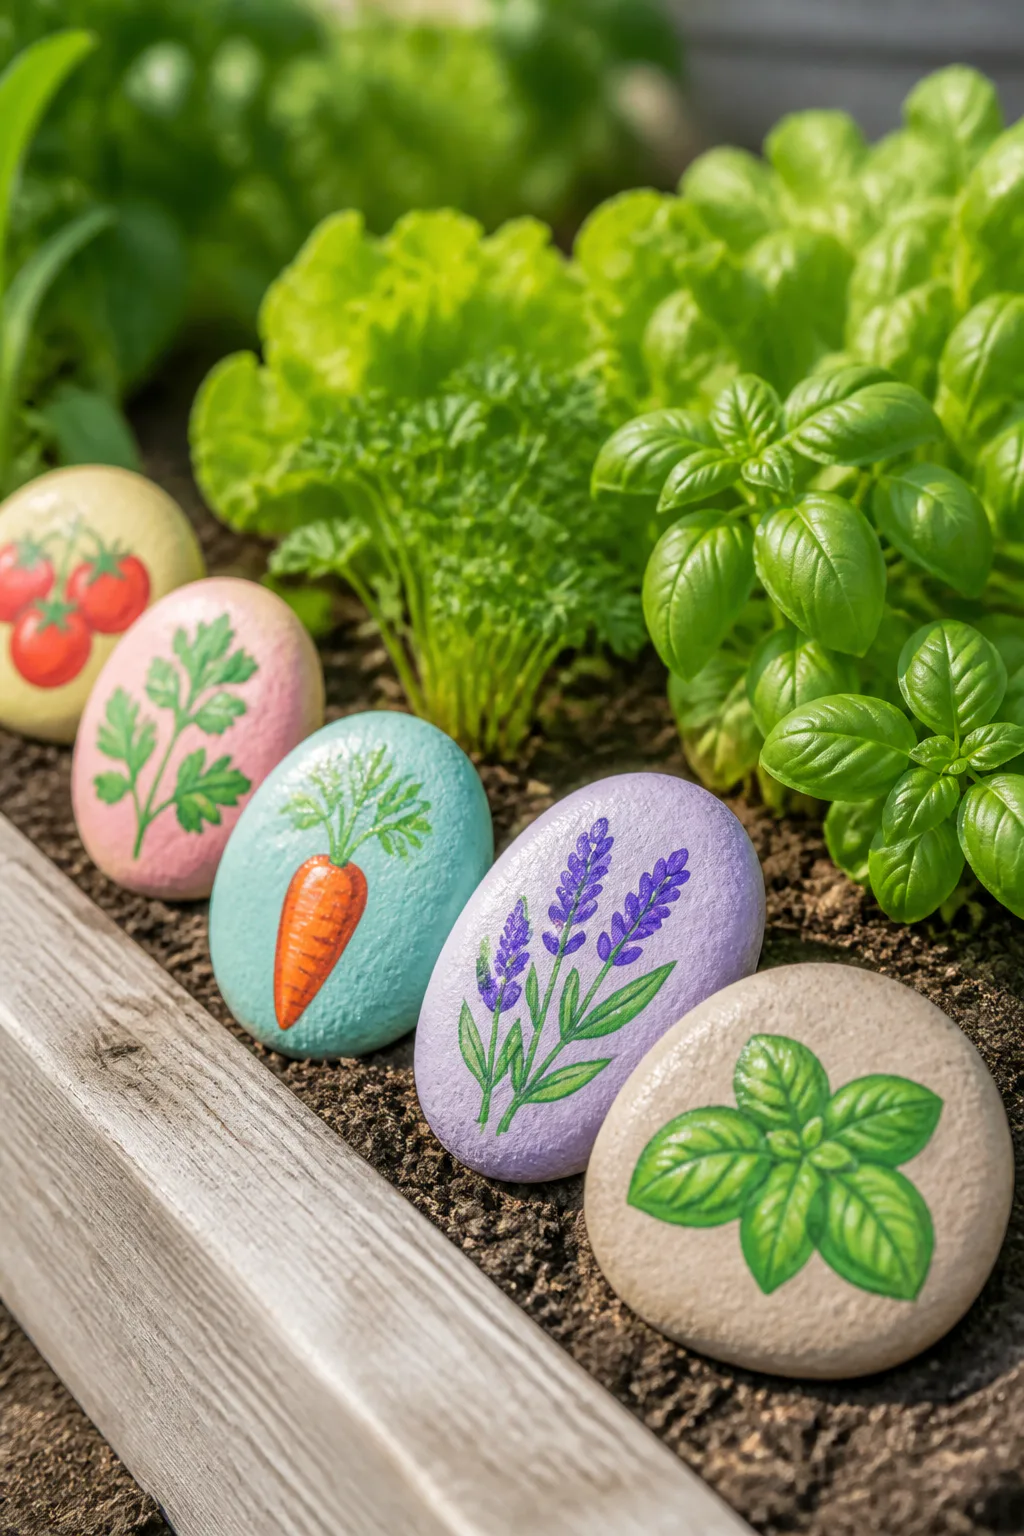
Smooth rocks make sturdy, charming labels for herbs and vegetables. Their natural shape fits neatly beside a row of seedlings, and a bright painted word or illustration can make a garden bed easier to navigate while adding a cheerful touch.
This is a flexible project for beginners because each marker can be as simple or detailed as you like. Paint a basil leaf, a carrot, or just the plant’s name; using a consistent palette helps a collection of different rocks look intentional rather than scattered.
How to make them last
Wash and dry each rock before painting so dirt doesn’t interfere with the finish. Use paint intended for outdoor crafts, allow it to dry fully, and add a clear outdoor sealant if you want extra protection from rain and sun.
- Choose flat or gently rounded rocks that are easy to write on.
- Use contrasting colors so labels remain readable among foliage.
- Place markers near plants without blocking sunlight or watering.
Keep a few unpainted rocks nearby to label new additions as your garden changes through the season.
2. Make a Teacup Bird Feeder

A vintage teacup and saucer can become a whimsical feeding spot that brings a small detail of indoor style outdoors. Set on a stake, it works well near a flower bed, along a garden border, or in a quiet corner where you can watch visiting birds.
Look for a cup and saucer that sit securely together, and make sure the finished piece will be stable once mounted. The saucer provides a place for seed, while the cup creates a distinctive silhouette that feels at home among cottage-style planting.
Putting it together
Join the cup and saucer with an outdoor-appropriate adhesive, following its directions and allowing a full cure before installation. Attach the set firmly to a stake, then push the stake deep enough into the ground to reduce wobbling.
- Pick a sturdy, undamaged cup and saucer with a balanced shape.
- Position the feeder where it is visible but not in a busy walkway.
- Refresh the seed and clean the dish regularly.
A simple teacup feeder looks especially sweet beside flowering plants, but leave open space around it so birds can approach comfortably.
3. Create a Mosaic Gazing Ball

A mosaic gazing ball adds color and changing reflections to a flower bed, patio, or garden nook. Covering an old ball with small tiles, glass gems, or marbles turns a plain object into a focal point that catches the light from different angles.
The finished sphere can complement nearby flowers or offer a bright contrast to green foliage. Because this project involves many small pieces, it’s a good choice when you want a relaxed, hands-on craft that can be completed in stages.
Building the mosaic
Start with a clean, stable ball and plan a simple color pattern before attaching anything. Use an adhesive and grout suitable for outdoor conditions, follow their application instructions, and let the piece cure completely before placing it outside.
- Choose a base that can sit securely on a stand or in a garden bed.
- Arrange tiles close together for a fuller, more even surface.
- Wear protective gloves when handling broken ceramic or glass.
- Set the finished ball where it won’t roll or create a trip hazard.
A limited color palette can help the mosaic feel cohesive, while mixed pieces give it a more playful, collected look.
4. Build Upcycled Plate Flowers
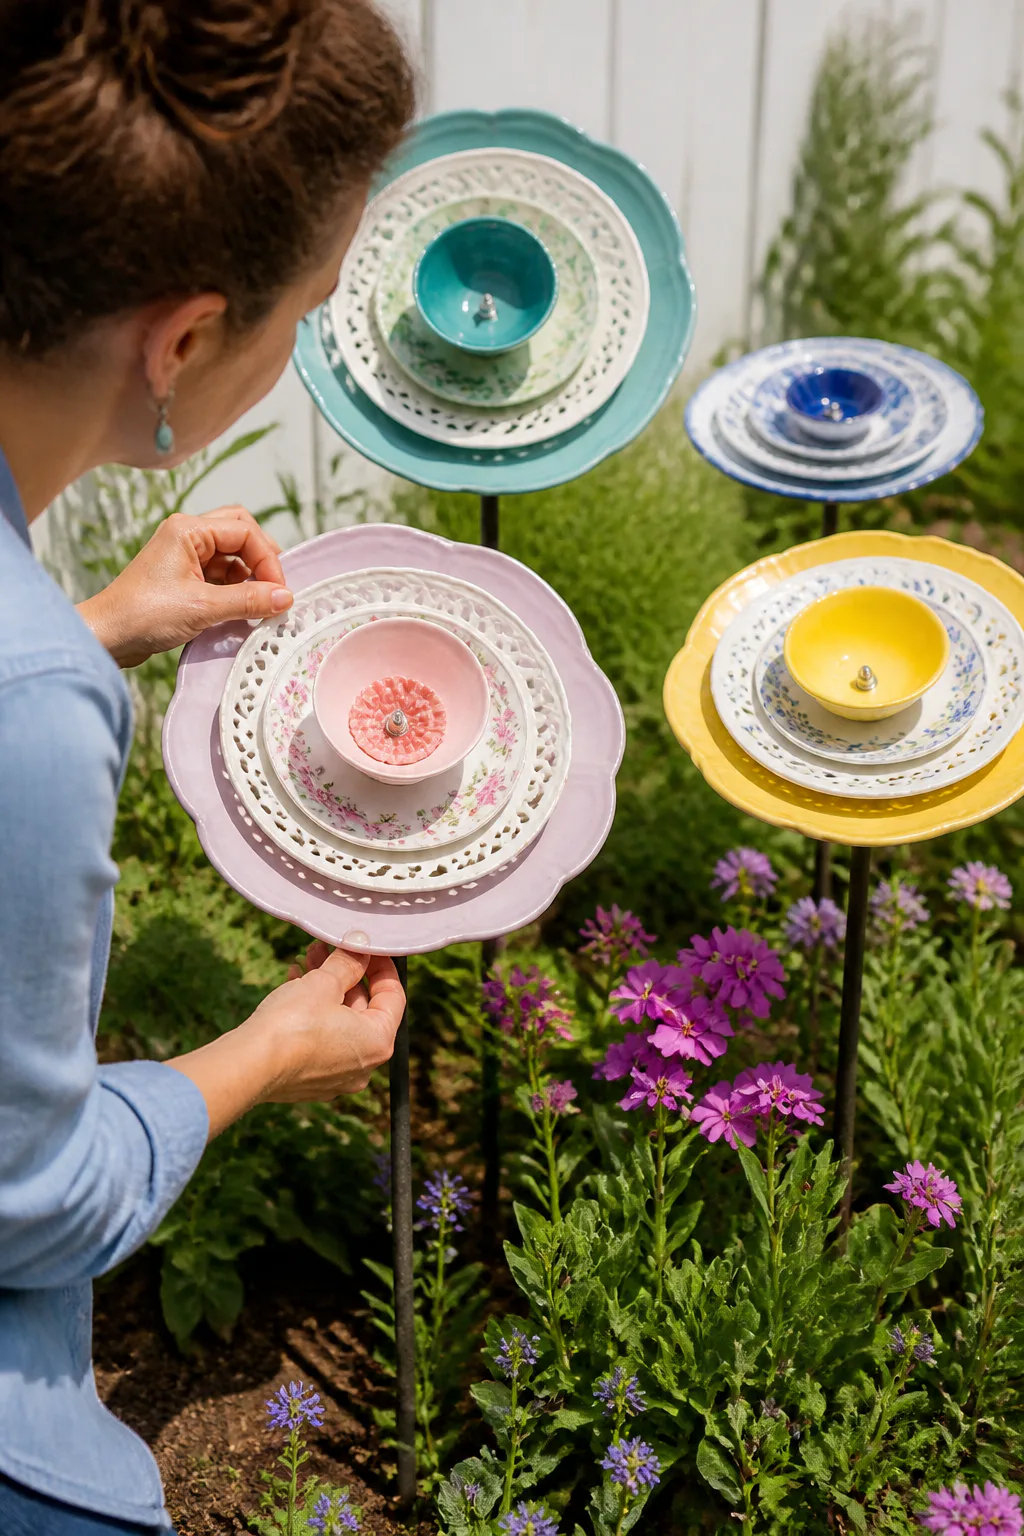
Layered thrift-store plates and bowls can form oversized flowers that stand above garden foliage. Mounted on a metal rod, each bloom becomes a permanent splash of color for a border, a fence-side planting area, or a spot where living flowers are sparse.
Mixing plate sizes gives the flower depth, while a small bowl or saucer at the center can create a clear focal point. Since plates vary in weight and shape, take time to arrange the layers on the ground before securing them.
Assembling a sturdy bloom
Use a threaded metal rod and suitable washers to hold the plates in place, securing each layer so it doesn’t shift. Choose a location where the rod can be pushed firmly into the soil, and keep the finished flower away from places where people might bump into it.
- Look for plates with colors or patterns that work together.
- Place the largest plate at the back and smaller pieces toward the center.
- Check for cracks or sharp edges before handling and assembly.
One plate flower can act as an accent; a small group in varied heights creates a more noticeable garden display.
5. Stack a Tilted Tiered Herb Planter
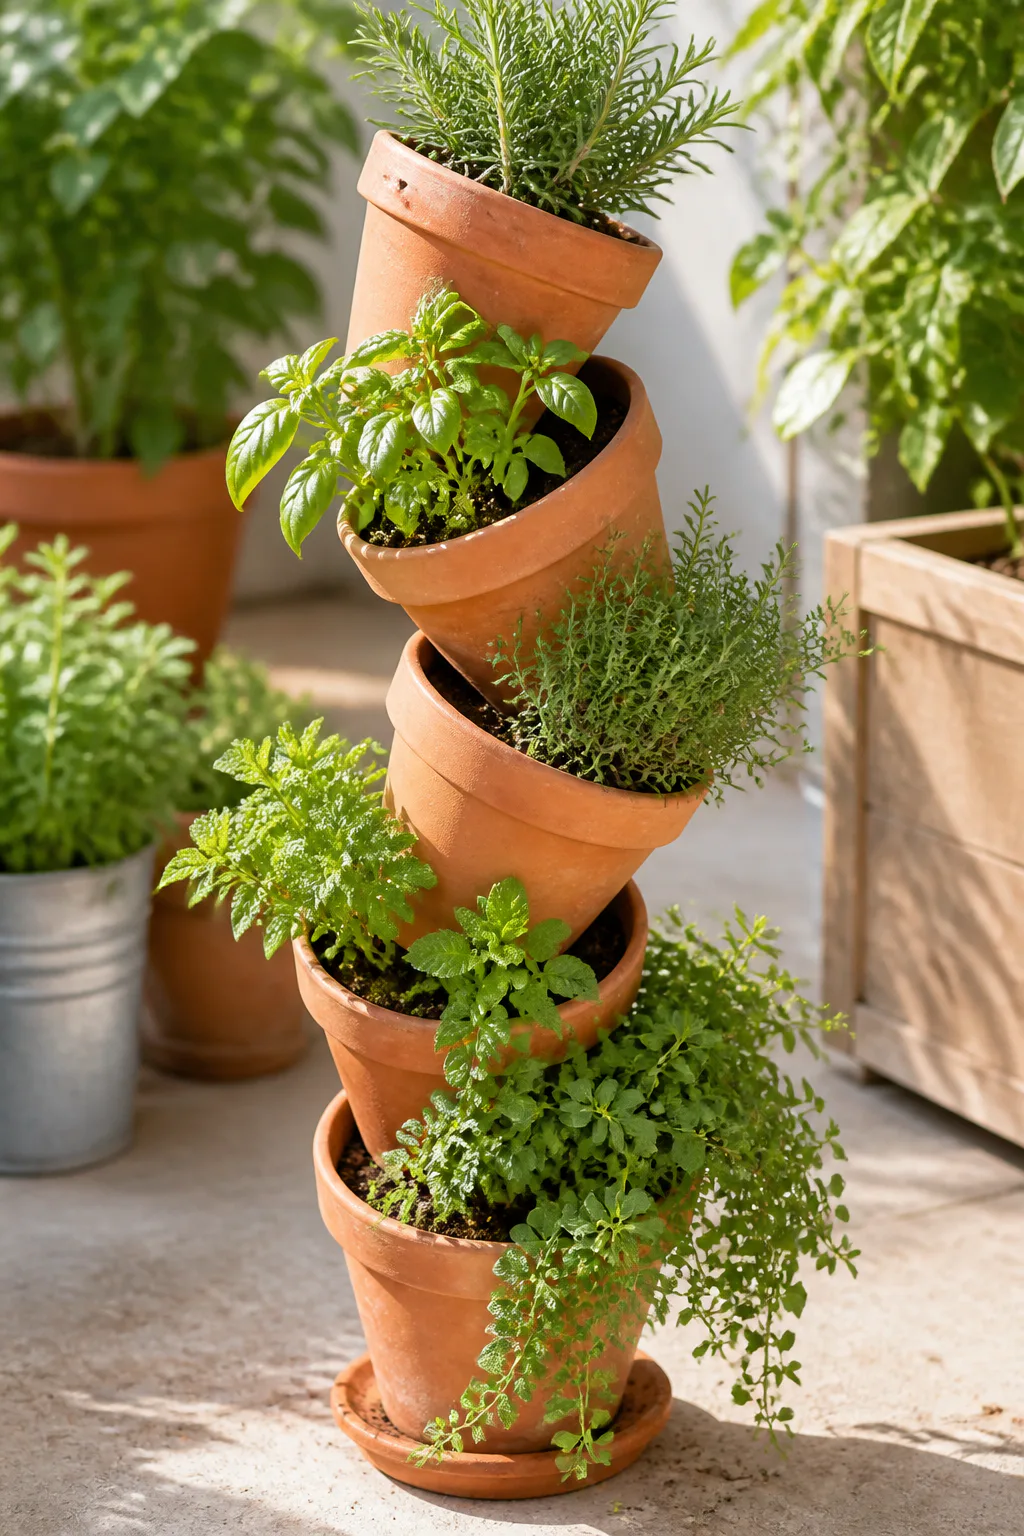
A tilted stack of terracotta pots turns a compact footprint into a lively vertical herb display. The alternating angles create a playful shape, and trailing herbs can soften the edges as they grow, making this a useful feature for a sunny patio or kitchen garden.
Each pot offers its own planting pocket, so you can group herbs by watering needs or keep favorites within easy reach. The design works best when the central support is secure and the pots are arranged with enough room for plants to develop.
Stacking the pots safely
Drive a strong stake into the ground and thread the pots onto it, angling each one in a different direction. Use a stake suited to the size of your planter, and check that the stack feels stable before filling it with soil and plants.
- Choose pots with drainage holes to help prevent waterlogging.
- Place sun-loving herbs where they receive the light they need.
- Leave room for trailing plants to spill over without crowding others.
This planter brings herbs close together, so check soil moisture regularly, especially during warm or windy weather.
6. Hang a Silverware Wind Chime

Mismatched spoons and forks can become a rustic wind chime with a soft, occasional clink. Hang them from driftwood or an old colander to create a small kinetic accent near a porch, garden seating area, or sheltered tree branch.
The appeal is in the mix: different utensil shapes and lengths create a relaxed, collected look. A simple support keeps the project approachable, while spacing the pieces carefully helps them move freely instead of tangling together.
Making a balanced chime
Attach each piece with weather-resistant cord or wire, allowing enough length for utensils to tap one another when the breeze moves them. If you bend a fork or spoon to create a hanging loop, work slowly and use appropriate tools to avoid sharp edges.
- Choose utensils that are light enough to move in a gentle breeze.
- Vary hanging lengths for a layered appearance and sound.
- Secure the top support firmly before hanging it outdoors.
- Check cords and connections now and then for wear.
Try the chime in a spot where its sound will be pleasant rather than distracting, and bring it in during severe weather if needed.
7. Add Painted Concrete Garden Mushrooms

Concrete mushrooms bring a playful, storybook touch to a shady border, beneath a tree, or beside a path. Their sculptural shape gives the garden an accent that remains visible even when surrounding plants change with the seasons.
You can form the caps and stems with simple molds, such as a bowl for the top and a tube-shaped form for the base. Bright colors make the mushrooms stand out, while earthy shades can blend more gently into a natural planting scheme.
Molding and painting
Prepare the concrete according to its directions and use molds that release the finished pieces cleanly. Let each part cure fully before joining or painting it, and choose a stable base so the mushroom won’t tip in wind or be easily knocked over.
- Use gloves and follow safety guidance when mixing cement.
- Keep cap and stem proportions balanced for a sturdy shape.
- Apply outdoor paint only after the concrete is fully cured.
A few mushrooms in different sizes can look more natural than a perfectly matching row. Place them where they add surprise without narrowing a walkway.
8. Line a Path with Mason Jar Solar Lanterns

Mason jars fitted with solar lid lights can create a welcoming evening glow beside a garden walkway. Repeating the jars along a path helps define its edge, while a single lantern can brighten a step or mark the entrance to a seating area.
The clear glass keeps the look simple and lets the light stand out after dusk. If you prefer a more collected style, use a mix of jars or glass bottles, as long as the solar lids fit securely and the panels can receive daylight.
Planning the pathway display
Use solar replacement lids designed to fit your containers, and place each light where its solar panel is not shaded during the day. Arrange the jars at a consistent spacing so the path feels considered without making the garden look crowded.
- Test the lights in their intended locations before settling on a layout.
- Keep glass containers away from spots where they could be kicked or knocked over.
- Use jars with clean, intact rims for a secure lid fit.
Solar lights vary with weather and daylight, so treat them as gentle accent lighting rather than the only source of visibility on a path.
9. Display Pots on a Ladder Plant Stand

An old step ladder can become a tiered plant stand that brings pots to different heights. Lean it securely against a fence or shed, or use a stable freestanding ladder, to add vertical interest on a patio or in a garden corner.
The steps make it easy to group plants by size and create a layered display. Trailing vines can soften the ladder’s lines, while compact pots keep the arrangement from feeling top-heavy or blocking access to plants behind it.
Styling the shelves
Before adding pots, check that the ladder is sound and stable on the surface where it will sit. Arrange heavier containers on lower steps and lighter ones higher up, and leave enough space to water and care for every plant.
- Choose a ladder without loose steps or damaged supports.
- Use pots that sit flat and securely on each step.
- Mix upright plants with a few trailing varieties for dimension.
- Position the stand where it won’t obstruct a gate or walkway.
A ladder stand is easy to refresh as plants change, so it can evolve from spring seedlings to summer flowers and foliage.
10. Hang a Chandelier Crystal Tree Mobile

Salvaged chandelier crystals can bring unexpected sparkle to a tree branch or sheltered garden nook. As sunlight moves through the garden, the hanging pieces catch and reflect it, adding a delicate accent above a seating area or near a window where you can enjoy the view.
This idea works best as a light-touch detail rather than a large, crowded installation. A few crystals at different lengths can create movement while allowing the branch and surrounding leaves to remain part of the display.
Hanging crystals outdoors
Use strong, weather-appropriate line or wire and check that each crystal is attached securely. Choose a branch that is sturdy and easy to reach for occasional maintenance, and avoid hanging the mobile where it could swing into people or fragile plants.
- Inspect salvaged crystals for chips or sharp edges before use.
- Vary the lengths to create a loose, graceful arrangement.
- Keep the display clear of walkways and frequently used doors.
- Remove it during harsh weather if the materials or branch need protection.
Let the light guide placement: a spot with shifting sun can make the crystals feel lively throughout the day.
11. Turn an Old Tire into a Painted Planter

A used tire can be repurposed as a bold planter for flowers or hostas, giving a garden bed a clear burst of color. Set it on a level surface and fill it with planting soil to create a simple container for a patio, lawn edge, or casual backyard display.
Paint changes the look dramatically: choose a bright shade for a playful accent or a quieter color that works with nearby pots and outdoor furniture. Consider the size of the tire and the mature plants you want to grow before choosing its location.
Preparing the planter
Clean the tire and let it dry before applying paint suitable for outdoor use. Position it where it will remain stable, and make sure water can drain rather than collect around the roots after rain or watering.
- Use a color that complements the surrounding garden palette.
- Choose plants suited to the light and space at the tire’s location.
- Check drainage and avoid overfilling the container with soil.
- Keep the planter away from places where it could obstruct access.
One painted tire can stand alone as a focal point, while several in coordinated colors can define a relaxed, informal planting area.
12. Make a Log Stump Planter

A hollowed log or stump planter lets a piece of fallen wood become part of the garden rather than something to discard. Its weathered texture pairs naturally with foliage, making it a fitting accent in a woodland-style bed, beside a path, or near a patio.
Use the opening for succulents, compact flowers, or cascading plants that soften the edges. The planter can look especially appealing when the wood’s natural character remains visible, so avoid covering every surface with paint or decoration.
Preparing the planting pocket
Hollow out a space deep enough for roots and soil, then line the opening if needed to help contain the growing medium. Make sure excess water can escape, and place the log on a stable surface before planting so it won’t roll or shift.
- Choose wood that is sturdy enough to hold its shape.
- Match plants to the sunlight and moisture at the chosen spot.
- Leave some wood visible to preserve the natural look.
- Check the planter occasionally for changes as the wood weathers.
A log planter feels most at home among other natural materials, such as stones, bark, and leafy ground cover.
13. Create a Colorful Bottle Tree

A bottle tree turns glass bottles into a sculptural garden feature that can stand out against a fence or open patch of lawn. Inverted bottles in blues, greens, or amber catch daylight and give a vertical display a lively, collected character.
You can arrange the bottles on a sturdy post or over the arms of a tomato cage, depending on the structure and the look you want. A single color creates a calmer silhouette, while several shades bring a more playful, layered effect.
Arranging bottles securely
Choose a stable support and set it firmly in the ground before adding bottles. Check that each bottle sits securely on its holder, and place the display somewhere it won’t be bumped by a mower, passing people, or garden equipment.
- Use bottles that are clean and free of cracks or sharp damage.
- Vary bottle heights and colors for visual rhythm.
- Keep the tree clear of busy walkways and play areas.
- Recheck the structure after strong winds or other rough weather.
A bottle tree can serve as a focal point, so give it a little breathing room instead of crowding it with other tall decor.
14. Build a Miniature Fairy Garden
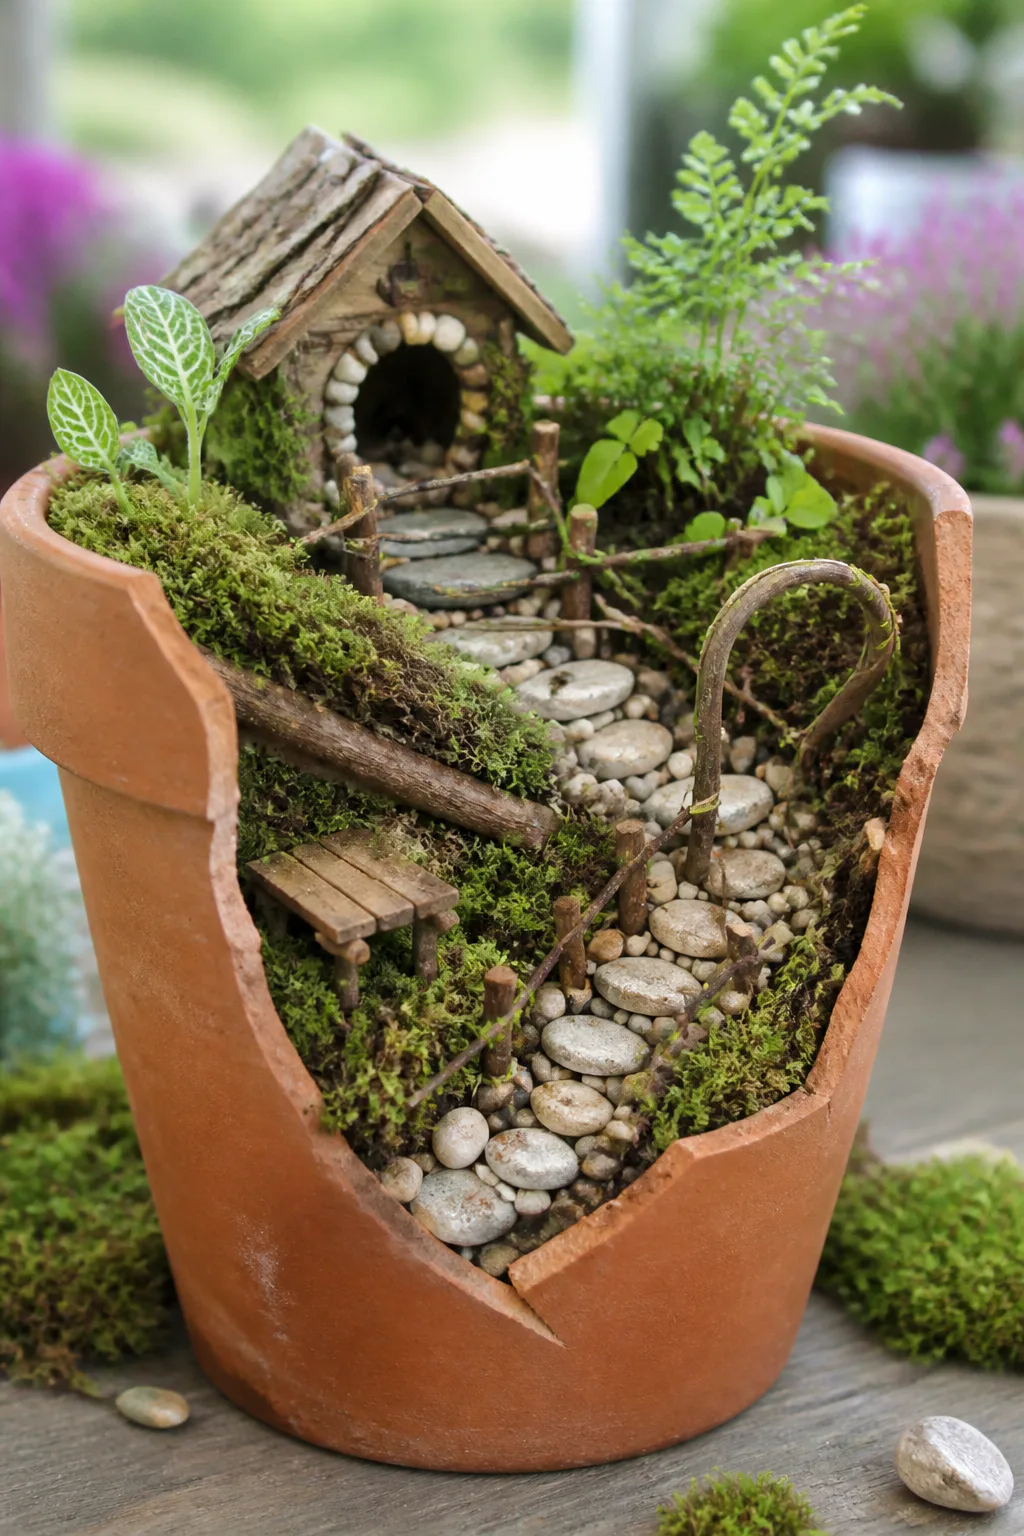
A broken terracotta pot or small wooden crate can become the base for a miniature garden. Moss, pebbles, twigs, and tiny plants make a small landscape with a path and a sense of discovery, whether it sits on a patio table or among larger garden beds.
The best designs leave room for the details to be noticed. A winding pebble path, a little cluster of moss, or a few upright twigs can suggest a tiny scene without requiring many purchased accessories.
Creating a tiny landscape
Start with a container that can hold soil and remain steady where you plan to display it. Arrange the main features before planting, then add small plants suited to the light and moisture available in that location.
- Use a cracked pot’s opening as a natural terrace or pathway.
- Gather clean pebbles, twigs, and moss for simple details.
- Choose compact plants that won’t quickly overwhelm the scene.
- Keep the miniature garden accessible for watering and upkeep.
Because the scale is small, a few thoughtful details often look better than filling every open space.
15. Hang a Colander Flower Planter

A vintage metal colander has a built-in garden-friendly feature: drainage holes. With chains attached, it can become a hanging planter for flowers, adding a rustic touch to a porch, pergola, or sturdy tree branch.
The bowl shape creates a rounded display that works well with compact blooms or plants that spill over the rim. A colander’s open design also means the soil may dry faster than in a solid container, so choose plants and a location with watering needs you can manage.
Preparing the hanging basket
Inspect the colander and its handle points before attaching chains, and make sure the hanging support is strong enough for the filled planter. Add a suitable liner if needed to help hold soil while keeping drainage in mind.
- Use matching chains or cords so the planter hangs evenly.
- Choose plants that suit the light where the basket will hang.
- Check that soil stays in place when watering.
- Hang it high enough to avoid head bumps but low enough to tend.
A colander planter looks especially inviting when trailing leaves soften its outline and echo the relaxed, upcycled feel.
16. Make a Twig Trellis for Climbing Plants
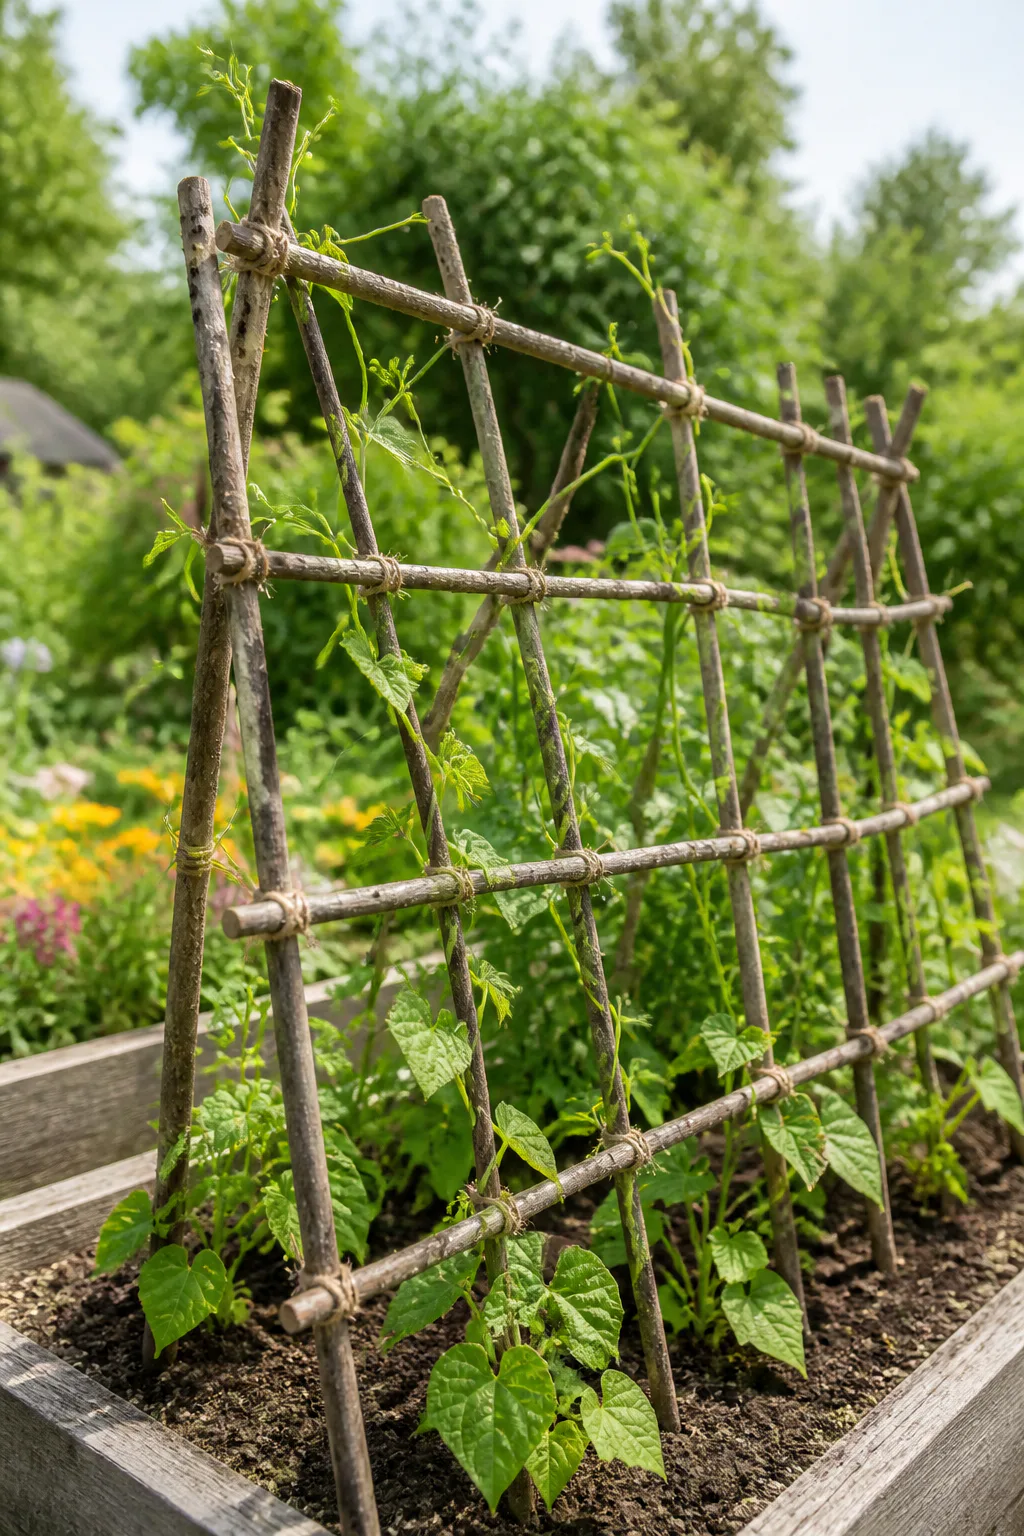
A twig trellis gives climbing beans or sweet peas a natural support while adding handmade structure to a garden bed. Made from fallen branches or pruning scraps, it blends easily into a vegetable patch, cottage-style border, or container garden.
Arrange the branches in a simple geometric pattern, such as a fan or grid, to give tendrils several points to grab. The finished support can be practical without looking overly polished, and its shape adds interest before the plants fill in.
Building the framework
Select straight branches that are long and sturdy enough for your chosen climbers. Bind the intersections securely with garden twine, then push the trellis ends into the soil or anchor them to a stable structure before training plants onto it.
- Use branches without loose bark or obvious damage.
- Space crosspieces so young stems can find support as they grow.
- Choose a shape that fits the planting area without blocking access.
- Check the ties and supports as the climbers gain weight.
Let the plant’s natural growth soften the framework, while keeping enough space to harvest or prune when needed.
Frequently Asked Questions
What can I make for my garden from things I already have?
Old teacups, plates, colanders, jars, tires and cutlery can become feeders, planters, lights and wind chimes. Make sure anything holding soil has drainage holes.
How do I weatherproof DIY garden decor?
Use exterior paint and seal painted pieces with an outdoor-rated clear coat. Bring delicate items such as ceramics and crystals inside before freezing weather.
What garden decor works in small spaces?
Vertical projects like a ladder plant stand, a hanging colander planter or a twig trellis add interest without using much ground space.
Final Thoughts
Handmade garden decor can be both expressive and useful, from rock markers that help identify herbs to trellises that support climbing plants. Upcycled plates, jars, utensils, wood, and glass offer plenty of ways to add personality without making every project complicated.
Choose one idea that suits your space and the materials you have, then adapt the colors, scale, and placement to fit your garden. A few thoughtful details can make an outdoor space feel more welcoming, personal, and distinctly yours.
More garden projects: see our budget garden decor ideas and patio container garden ideas.



