13 Stunning Kitchen Lighting Ideas
Good kitchen lighting does more than make it easier to chop vegetables or find a mug. A thoughtful mix of ambient, task, and accent lighting can shape the room’s mood, highlight favorite materials, and make everyday routines feel more comfortable.
These kitchen lighting ideas range from statement-making island fixtures to subtle cabinet and toe-kick LEDs. Some are best suited to a remodel, while others can be added to a finished kitchen with relatively little visual disruption.
Whether you have a spacious island, a compact kitchen, or a lower ceiling that limits hanging fixtures, focus on how you use the room and where light is needed most. The right combination of layers can make the kitchen feel practical by day and inviting after dark.
1. Hang Smoked Glass Pendants Over the Island
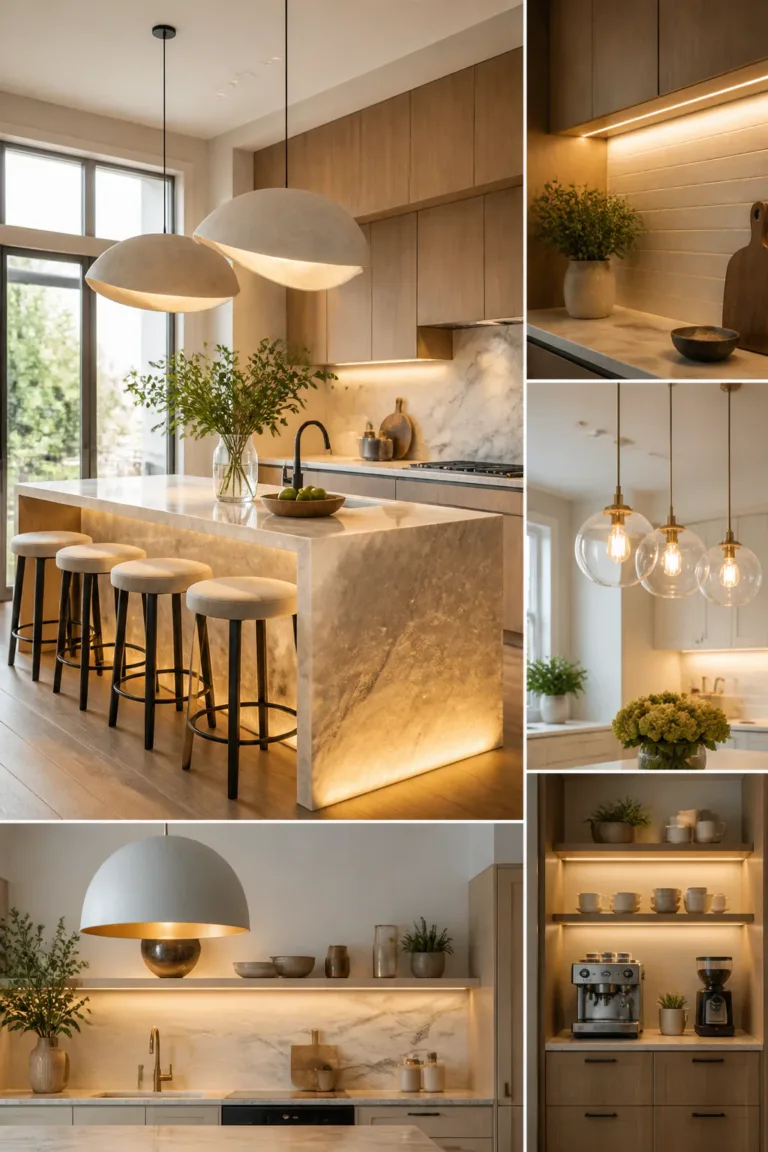
Smoked ripple-glass pendants bring soft texture and a gentle shimmer to an island without making the fixture feel visually heavy. A linear cluster creates a clear focal point, while the rippled glass diffuses the light for a more relaxed effect than a bare bulb.
This look works especially well above an island that doubles as a gathering place. The darkened glass can complement black or brass finishes, wood accents, and neutral cabinetry, while the transparent quality helps preserve sightlines across an open kitchen.
How to pull it off
Choose a fixture scaled to the island and arrange the shades so they provide useful light without obstructing conversation. Check the bulb type and shade transparency, since heavily tinted glass can soften the output more than expected.
- Use a linear fixture or evenly spaced cluster to relate to the island’s shape.
- Coordinate metal finishes with cabinet hardware or nearby faucets.
- Place pendants where they light the work surface without blocking views.
- Add a dimmer to shift from meal prep brightness to a softer evening glow.
For balanced illumination, pair the pendants with recessed or under-cabinet lighting rather than asking them to light the entire room.
2. Install a Sleek LED Linear Island Light
A slim linear LED fixture over the island gives the kitchen a clean, streamlined look. Its simple shape can sit comfortably in a modern space, and integrated LEDs avoid the visual clutter of several separate shades or exposed bulbs.
Because the light is spread along a narrow form, this style can illuminate a long island while keeping the view across the room open. A minimal fixture is also useful when the kitchen already has strong materials, such as veined stone, dramatic cabinetry, or distinctive pendant-free architecture.
Design tips
Look for a fixture with a length that feels proportional to the island, and consider whether its light is directed down, up, or in both directions. A dimmable model makes the straightforward silhouette more versatile, especially in kitchens that transition from work space to entertaining area.
- Match the fixture’s finish to a few existing details, not every metal in the room.
- Check that the light reaches the island’s full working area.
- Choose a dimmable option for flexible brightness throughout the day.
- Keep surrounding ceiling fixtures simple to maintain a calm composition.
This is a practical way to make the island feel finished without adding a bulky visual centerpiece.
3. Backlight a Translucent Stone Island
Backlighting translucent stone turns an island into a glowing architectural feature. LEDs behind suitable marble, quartz, or onyx can reveal subtle veining and color variation, making a waterfall edge or selected panel stand out after the main task lighting is dimmed.
This is an accent-lighting idea rather than a replacement for functional illumination. It suits a kitchen where the island is already a visual anchor and where the stone has enough translucency to transmit light in an appealing, even way.
What to consider
Plan the lighting with the stone and cabinetry choices, since the effect depends on the material, the placement of the LEDs, and how neatly the light is diffused. A lighting professional or stone fabricator can help determine whether a particular slab is appropriate for backlighting.
- Ask whether the chosen stone transmits light before committing to the design.
- Use concealed LEDs to keep the source itself out of view.
- Consider backlighting one feature instead of illuminating every surface.
- Connect the accent lights to a dimmer for a subtler evening effect.
Keep ordinary task lights in the plan so the dramatic glow remains one layer of a well-lit kitchen.
4. Create a Warm-to-Cool Smart Lighting Scene
Tunable LED lighting lets the kitchen shift between different tones throughout the day. Brighter, cooler light can feel crisp for morning routines and food preparation, while a warmer setting makes the room feel more relaxed at dinner or during a quiet evening.
This approach is useful when the kitchen serves several purposes, from cooking and homework to hosting friends. Rather than relying on one color temperature everywhere, you can create a more comfortable atmosphere that suits the activity and the natural light coming through the windows.
Set up useful scenes
Choose tunable lights and controls that work together, then keep the settings simple enough to use regularly. You might begin with a bright everyday scene and a warmer evening scene before adding any additional schedules or automations.
- Use a clear, bright setting for detailed prep and cleanup.
- Set a warmer tone for meals and relaxed evenings.
- Keep task lighting bright enough even when ambient lights are softened.
- Check compatibility between bulbs, fixtures, and the control system.
Thoughtful settings make the room adaptable without requiring a complicated routine every time you turn on the lights.
5. Add Hidden Under-Cabinet LED Strips
Under-cabinet LEDs send light directly onto counters, where shadows from upper cabinets can make chopping and other tasks harder. Slim light bars or tape lights tucked beneath the cabinets brighten the work surface while keeping most of the hardware out of sight.
This is one of the most useful upgrades for a kitchen with dim counters or limited natural light. The strips can also make the backsplash and countertop materials more visible, adding a gentle layer of illumination when overhead lights are not needed at full strength.
Plan for an even glow
Position the light toward the front of the cabinet underside to illuminate the counter instead of the back wall alone. Before installing, consider how the wires will be concealed and whether the system can be controlled separately from the main ceiling lights.
- Choose a continuous light source to reduce dark gaps between fixtures.
- Hide the strips behind a cabinet lip or slim channel where possible.
- Use a switch or dimmer that is convenient to reach.
- Match the light tone to other task lighting in the kitchen.
When paired with ambient ceiling lights, under-cabinet illumination makes the kitchen both easier to work in and more layered.
6. Style a Cordless Lamp on the Counter
A small cordless lamp on the counter brings a softer, more domestic feeling to a room often dominated by built-in lighting. Its pool of warm light can make a quiet corner feel inviting without adding another ceiling fixture or requiring a nearby outlet.
Set one on a counter away from the sink, stove, and main prep zone, such as a coffee station or a clear corner. The lamp is especially appealing in an open-plan kitchen, where a small warm glow can connect the cooking area to the more relaxed mood of the adjoining living space.
Choose a practical spot
Think of the lamp as accent lighting, not a substitute for task lights. Select a stable model that is easy to recharge, and leave enough counter space around it so it does not interfere with everyday routines.
- Place it in a low-traffic corner or beside a coffee setup.
- Keep it well away from splashes, heat, and active prep areas.
- Choose a size that fits the counter without crowding it.
- Use a warm setting for a gentle evening atmosphere.
Because it is portable, the lamp can move when the counter needs to be cleared or the room’s layout changes.
7. Center an Organic Statement Pendant
One oversized curved or woven pendant can give an island a relaxed focal point. Its organic shape adds softness to kitchens filled with straight cabinet lines, while a natural-looking texture can bring warmth to a palette of stone, painted surfaces, or stainless steel.
This idea works best when the island has enough visual and physical space to support a larger fixture. Replacing several smaller pendants with one statement piece can simplify the ceiling and draw attention to the island without making the rest of the room feel busy.
Balance shape and scale
Before choosing a pendant, consider the island’s length, ceiling height, and how the fixture will affect sightlines. Woven or sculptural shades can create beautiful shadows, so make sure the light source also provides enough practical illumination for the surface below.
- Center the fixture over the island’s main working or gathering area.
- Check its hanging height from standing and seated viewpoints.
- Pair decorative light with separate task lighting as needed.
- Keep nearby ceiling details restrained so the pendant can stand out.
A single expressive fixture can make the island feel intentional while keeping the overall lighting plan simple.
8. Illuminate Glass-Front Kitchen Cabinets
Interior lighting inside glass-front cabinets turns everyday dishes and glassware into a subtle display. Vertical light strips can wash the cabinet interior evenly, helping shelves feel brighter and giving the kitchen more depth after the main lights are dimmed.
This works well for upper cabinets, a glass-front pantry, or a dedicated display section. It is particularly effective when the contents are arranged with some breathing room, since a crowded cabinet can look busy once illuminated.
Make the display feel considered
Plan where the light source will sit so it is visible as little as possible through the glass. A warm, controlled glow usually feels inviting, while separate switching or dimming makes it easy to use the cabinet lighting as an accent rather than a constant feature.
- Use lighting designed for the cabinet’s interior dimensions.
- Arrange dishes and glassware with consistent spacing.
- Keep cords and connections concealed where practical.
- Put display lighting on a separate switch or dimmer.
Even one illuminated cabinet can add a polished layer without requiring every storage area to become a display.
9. Pair Brass Fixtures with Matte Black Details
Combining antique brass or milk-glass lighting with matte-black kitchen details creates a mix of nostalgic warmth and contemporary contrast. The pairing can make a kitchen feel collected rather than overly matched, especially when the fixture has a classic shape and the hardware stays clean-lined.
This approach suits a variety of interiors, from updated traditional kitchens to modern spaces that need a softer accent. The key is to repeat each finish enough to make the combination feel deliberate, while allowing one material to take the lead.
Keep the mix balanced
Look at the fixture alongside cabinet pulls, faucets, and other visible metal finishes before making a final choice. Brass can bring warmth, while matte black provides definition; repeating these tones in small, thoughtful ways helps connect the different elements.
- Choose one finish as the main accent and use the other more sparingly.
- Repeat brass or black in at least one nearby detail.
- Consider milk glass for a softer contrast against dark hardware.
- Keep the fixture’s scale and shape appropriate to the kitchen.
The result feels layered and personal without depending on every metal surface matching exactly.
10. Aim Recessed Lights Toward Pantry Shelves

Adjustable gimbal downlights can direct illumination into deep pantry shelves, where fixed ceiling lights may leave items in shadow. They can also highlight a piece of kitchen artwork or another feature that deserves more attention than general overhead lighting provides.
This is a useful choice when you want a tidy ceiling and targeted light without hanging a fixture in the way. It works best when the light can be aimed toward a specific surface rather than simply scattered across the room.
Direct the beam thoughtfully
Plan the light placement around the shelves, doors, or artwork you want to illuminate. The direction matters: a well-aimed beam helps reveal what is stored, while a poorly positioned one can create glare or put the brightest spot in an unhelpful place.
- Position lights to reach the pantry’s usable shelf area.
- Aim the beam away from eye level to reduce glare.
- Use adjustable fixtures where the target may change over time.
- Layer focused light with general room illumination.
Targeted recessed lighting is a discreet way to make storage easier to use while keeping the ceiling visually quiet.
11. Add a Floating Glow with Toe-Kick LEDs
LED strips installed in the recessed space beneath base cabinets create the impression that the cabinetry is floating. The low, indirect glow adds visual depth and can serve as a gentle pathway light when the kitchen is being used at night.
Because the light is close to the floor, it is best treated as an accent rather than a source for cooking or cleanup. The effect is especially appealing with simple cabinet fronts, where a subtle line of light can emphasize the kitchen’s shape without adding another visible fixture.
Keep the light subtle
Hide the strip far enough under the cabinets that the LEDs themselves are not directly visible from standing or seated positions. Plan for a convenient control, and make sure the installation can be kept clean in a space that collects dust and crumbs.
- Use a low-profile strip suited to the cabinet recess.
- Conceal the light source to avoid a dotted or glaring effect.
- Choose a soft setting for nighttime navigation.
- Control toe-kick lighting separately from task lights.
Used sparingly, this small detail gives the kitchen a quiet, welcoming glow after dark.
12. Choose a Sculptural Flush Mount for Low Ceilings
Low ceilings do not rule out a distinctive kitchen light. A sculptural flush or semi-flush mount can bring character overhead without hanging low enough to crowd the room or interrupt views across the kitchen.
Geometric brass, artisanal ceramic, and other textured designs can make the ceiling feel considered while staying compact. This option is especially helpful in a smaller kitchen where pendant clearance is limited but a plain, basic fixture would feel like a missed opportunity.
Choose a fixture with presence
Look for a shape that feels expressive from below but remains close to the ceiling. Check how the fixture distributes light, too: a decorative shade may look striking but still need support from under-cabinet or recessed task lighting.
- Measure available clearance before selecting a semi-flush fixture.
- Choose a diameter that suits the room rather than overwhelming it.
- Consider how the shade directs light toward the ceiling and counters.
- Coordinate its finish with nearby hardware or other fixtures.
A carefully chosen low-profile fixture can make a compact kitchen feel finished without sacrificing headroom.
13. Install Smart Dimmers for Kitchen Lighting Zones
Smart dimmers make it easier to adjust separate kitchen lighting layers without relying on one all-or-nothing switch. Island, ambient, under-cabinet, and accent lights can each serve a different purpose, and independent controls let you shape the room for cooking, dining, or winding down.
This idea is most useful when the kitchen has several types of fixtures or connects directly to another living space. Dimming the island pendants while leaving the counters softly lit, for example, can create a comfortable evening setting without making the whole room dark.
Build simple, useful zones
Start by identifying which lights should work together and which need separate control. Confirm that the dimmers are compatible with the bulbs or integrated LEDs, and consider how guests or other household members will use the switches.
- Group lights by purpose, such as task, ambient, and accent.
- Create straightforward scenes for cooking and evening use.
- Check fixture and dimmer compatibility before installation.
- Keep manual controls easy to find and understand.
Well-planned zones help every other lighting idea work harder, making the kitchen adaptable throughout the day.
Final Thoughts
The most inviting kitchens rarely depend on a single fixture to do everything. Combining useful task lighting with ambient illumination and a few carefully chosen accents helps the room work well during busy routines and feel warm when the day slows down.
Start with the areas where you need better light, then choose one or two details that suit your kitchen’s scale and style. Whether you add under-cabinet LEDs, change the mood with dimmers, or make an island fixture the focal point, a thoughtful lighting plan can make the whole space feel more comfortable and complete.