16 Clever Valentine Box Ideas for Kids
A Valentine box gives kids a fun place to collect cards during a classroom exchange, party, or family celebration. The best designs turn an everyday container into something personal, playful, and easy to spot among a table full of mailboxes.
These 16 ideas range from cuddly creatures and favorite characters to sweet treats and whimsical objects. Many can be made with a shoebox or other sturdy container, plus simple supplies such as paper, paint, felt, and craft scraps.
Choose a design that fits the maker’s interests, available materials, and time. Before decorating, plan where cards will go in and how the box will open for retrieval; an adult can help with cutting openings or securing heavier decorations.
1. Make a Furry Puppy or Kitten Mailbox
Turn a shoebox into a cuddly-looking pet with faux fur or felt in a favorite animal color. This idea works well for young animal lovers, and its soft texture makes the box feel extra special without needing complicated shapes.
Use the short end of the box as the face so the eyes, ears, and mouth are easy to see. The mouth can double as the card slot, making the animal look like it is happily “eating” valentines.
How to pull it off
Cover the box before attaching smaller facial features, and keep the card opening clear. Felt is easier to trim neatly than fluffy fabric, while faux fur can add a cozy finish if an adult helps cut it.
- Choose floppy felt ears for a puppy or pointed ears for a kitten.
- Use a paper tube or felt shape to frame the mouth-shaped slot.
- Secure googly eyes and other small pieces firmly, especially for younger children.
A name tag or paper collar can make the pet feel like a one-of-a-kind classroom companion.
2. Build a Colorful Love Monster Box
A love monster is a cheerful choice when the goal is bold color, silly details, and plenty of room for personality. Start with a shoebox or small cardboard carton, then paint it pink, teal, purple, or another bright shade.
The design is flexible: one big eye, a whole cluster, or an amusing mix of different sizes can all work. Place the face on the broad side of the box so the monster greets classmates as they drop in their cards.
Design tips
Let the paint dry before adding the eyes, antennae, and mouth. A wide felt mouth can sit below the eyes, with the card slot tucked into or just above it so the opening remains easy to use.
- Arrange the googly eyes before gluing to test different expressions.
- Bend pipe cleaners into antennae, curls, or little hearts.
- Add felt teeth, a tongue, or small paper spots for extra character.
Because the monster can be delightfully imperfect, it is a forgiving project for kids who want to decorate freely.
3. Create a Pastel Unicorn Castle Box
Combine a dreamy unicorn with a fairytale castle by wrapping a sturdy box in pastel rainbow paper. The broad sides can become castle walls, while the top gives you space for a shining horn and simple turrets.
This design suits a Valentine exchange where a little sparkle and color are welcome. Cotton-ball or cotton-ball-style clouds around the base soften the box and help the finished creation feel like it is floating in a storybook scene.
How to pull it off
Cover the box first, then add the horn and cloud details after deciding where the card slot will sit. Keep the horn away from the opening, and make sure added decorations do not prevent the lid from lifting.
- Roll gold paper into a cone for the unicorn horn.
- Use pastel paper strips or panels to create a rainbow effect.
- Attach cotton balls around the bottom as clouds, leaving the base stable.
Paper turrets or little heart-shaped windows can finish the castle without making the box difficult to carry.
4. Design a Shark Jaws Card Box

A shark box makes the card slot part of the main design. Paint a sturdy box ocean blue, then place a wide, toothy mouth on one end so valentines seem to disappear straight into the shark’s jaws.
This idea is a natural fit for kids who love ocean animals or dramatic, funny designs. A simple fin on top helps the box read clearly as a shark, while a few waves or bubbles can decorate the sides without crowding the face.
Make the mouth functional
Plan the opening before adding the teeth. An adult can cut a wide slot through the cardboard, then paper teeth can be arranged around it so cards slide through without catching on sharp or bulky edges.
- Use white paper triangles for a toothy border.
- Make a dorsal fin from folded cardstock and attach it securely.
- Add paper bubbles or a tail shape to the sides for extra ocean detail.
Keep the mouth large enough for the cards but leave plenty of cardboard around it to preserve the box’s strength.
5. Turn a Box into a Bumblebee Hive
Transform a rectangular box into a bright beehive with yellow paper and black stripes. The simple pattern is easy to recognize, and small paper bees can make the project feel as though the hive is buzzing with Valentine excitement.
Set the bee decorations around the sides rather than over the card opening. This works well for a classroom mailbox because the main box can stay sturdy and practical while the little flying bees add movement and charm.
Decorating the hive
Wrap or cover the box in yellow first, then add stripes using paper or ribbon. A small arched doorway can be drawn or added as decoration, while the actual card slot can be placed on top or on a less busy side.
- Cut black paper strips to create even bands around the box.
- Make paper bees with yellow bodies, black stripes, and simple wings.
- Use curved paper trails to suggest the bees’ flight paths.
Keep the hive’s decorations flat enough that the box can sit securely on a desk or classroom table.
6. Craft a Classic Mailbox Valentine Box
A miniature postbox is a fitting way to collect valentines and has a familiar shape that is easy to decorate. Use a small cardboard box or a half-cylinder container, then paint it red or blue for a classic mail-inspired look.
A movable flag gives the box a playful detail and can signal that a new card has arrived. Place it on the side of the container, away from the slot and lid, so it can move without getting in the way.
Build in the mailbox details
Let the paint dry completely before attaching the flag and any lettering. A simple flap or drawn outline can suggest a real mailbox door, while the card opening should remain clearly marked and easy to reach.
- Cut a small flag from cardstock and attach it with a paper fastener.
- Add a contrasting stripe or simple “mail” label to the front.
- Use a box lid or back opening that can be opened to retrieve cards.
This straightforward design is a good pick when you want a recognizable theme without lots of extra pieces.
7. Stack Boxes into a Love Bot
Build a friendly robot by stacking one box for the head and a larger one for the body. Cover the boxes with foil or silver-colored paper, then decorate them with details that make the bot look ready to collect a whole load of Valentine mail.
The robot’s body provides plenty of room for dials, buttons, and heart-shaped controls. Keep the head light and securely attached, and place the card slot on the front or top of the body where it remains easy to use.
Give your robot character
Arrange the boxes before decorating so you can check the proportions and make sure the finished robot will stand steadily. Bottle caps can become knobs, while paper circles or drawn lines can suggest screens and controls.
- Use a smaller box for the head and a wider one for the body.
- Add bottle-cap details, paper dials, or foil-covered buttons.
- Attach paper or cardboard arms only if they won’t make the box tip.
A silly face, heart-shaped display, or name on the chest panel makes the Love Bot feel ready for its mission.
8. Make a Giant Lego Brick Box
A shoebox can become an oversized building brick with a coat of bold paint and a row of raised studs on top. Red, pink, yellow, and other bright colors help the block-like silhouette stand out on a classroom table.
The studs can be made from small cups or cardboard tubes cut to a suitable height. Arrange them in a neat pattern, but leave room for the card opening so the top remains useful rather than becoming a crowded surface.
Shape the brick
Paint the box and the stud pieces in the same color for a unified look. If the top will hold the slot, position the studs around its edges; otherwise, place the opening on a side panel that is easy to access.
- Use evenly spaced cups or cardboard tubes for the raised studs.
- Choose a sturdy shoebox that can handle the added pieces.
- Add a small paper heart or label without covering the brick shape.
The clean geometry makes this a satisfying project for kids who enjoy building and bright, simple designs.
9. Build a Gumball Machine Card Box
Give a plain box the look of a cheerful gumball machine by pairing a clear bowl with a decorated base. Colorful pom-poms create the impression of gumballs, while the lower box acts as the sturdy part that catches incoming cards.
Place the bowl above the card-collecting section, but keep the card slot separate and unobstructed. This playful design works well when you want a rounded, colorful centerpiece without needing to shape the entire box like a machine.
Put the pieces together
Choose a clear bowl that sits securely on the base and won’t wobble when the box is moved. Pom-poms can be placed inside as decoration, while a paper panel on the front can suggest a dispenser or coin slot.
- Fill the bowl with colorful pom-poms rather than loose small objects.
- Decorate the lower box with a contrasting color or simple machine details.
- Secure the bowl and keep the finished box stable on a flat surface.
A drawn dial or pretend dispensing lever adds detail without needing to make the mechanism functional.
10. Create a Minion Valentine Box
A tall yellow box makes a great base for a Minion-inspired Valentine collector. Add blue overalls along the lower half and a large silver-rimmed goggle eye on the front to create the familiar character look.
This design is easy to personalize with a single eye or a pair, different expressions, and a few playful hair pieces. Place the card slot on top or at the back so the face remains the main attraction.
Add the signature details
Paint or cover the box yellow before adding the blue section. A paper or felt circle can form the goggle, with a smaller circle inside for the eye; pipe cleaners make lightweight hair that is easy to bend into different shapes.
- Use blue paper or paint to create the overall-style lower half.
- Make the goggle rim from silver paper or a painted cardboard ring.
- Add a smile, pocket, or pipe-cleaner hair for a playful finish.
Keep the top opening clear and make sure the tall box can stand without tipping as cards are added.
11. Design a Giant Cupcake Box
Make a sweet treat that can collect cards by pairing a round container with an oversized frosting top. A hat box or similar container gives the cupcake a rounded shape, while pleated cardstock around the base suggests a paper wrapper.
Decorate the top with frosting-like swirls, paper sprinkles, or a pom-pom cherry. The card slot can go in the lid or near the top edge, as long as it stays accessible once the decorations are attached.
Make it look freshly frosted
Choose colors that suit the celebration, such as pastel pink frosting or a bright red cherry. Pleat the wrapper paper before attaching it around the base, and check that the container still opens easily for retrieving cards.
- Wrap the bottom in pleated brown or colored cardstock.
- Use paper shapes or confetti-like pieces for sprinkles.
- Top the design with a pom-pom cherry, keeping the slot clear.
A few paper hearts mixed with the sprinkles tie the cupcake into the Valentine theme.
12. Make a Box of Chocolates Mailbox
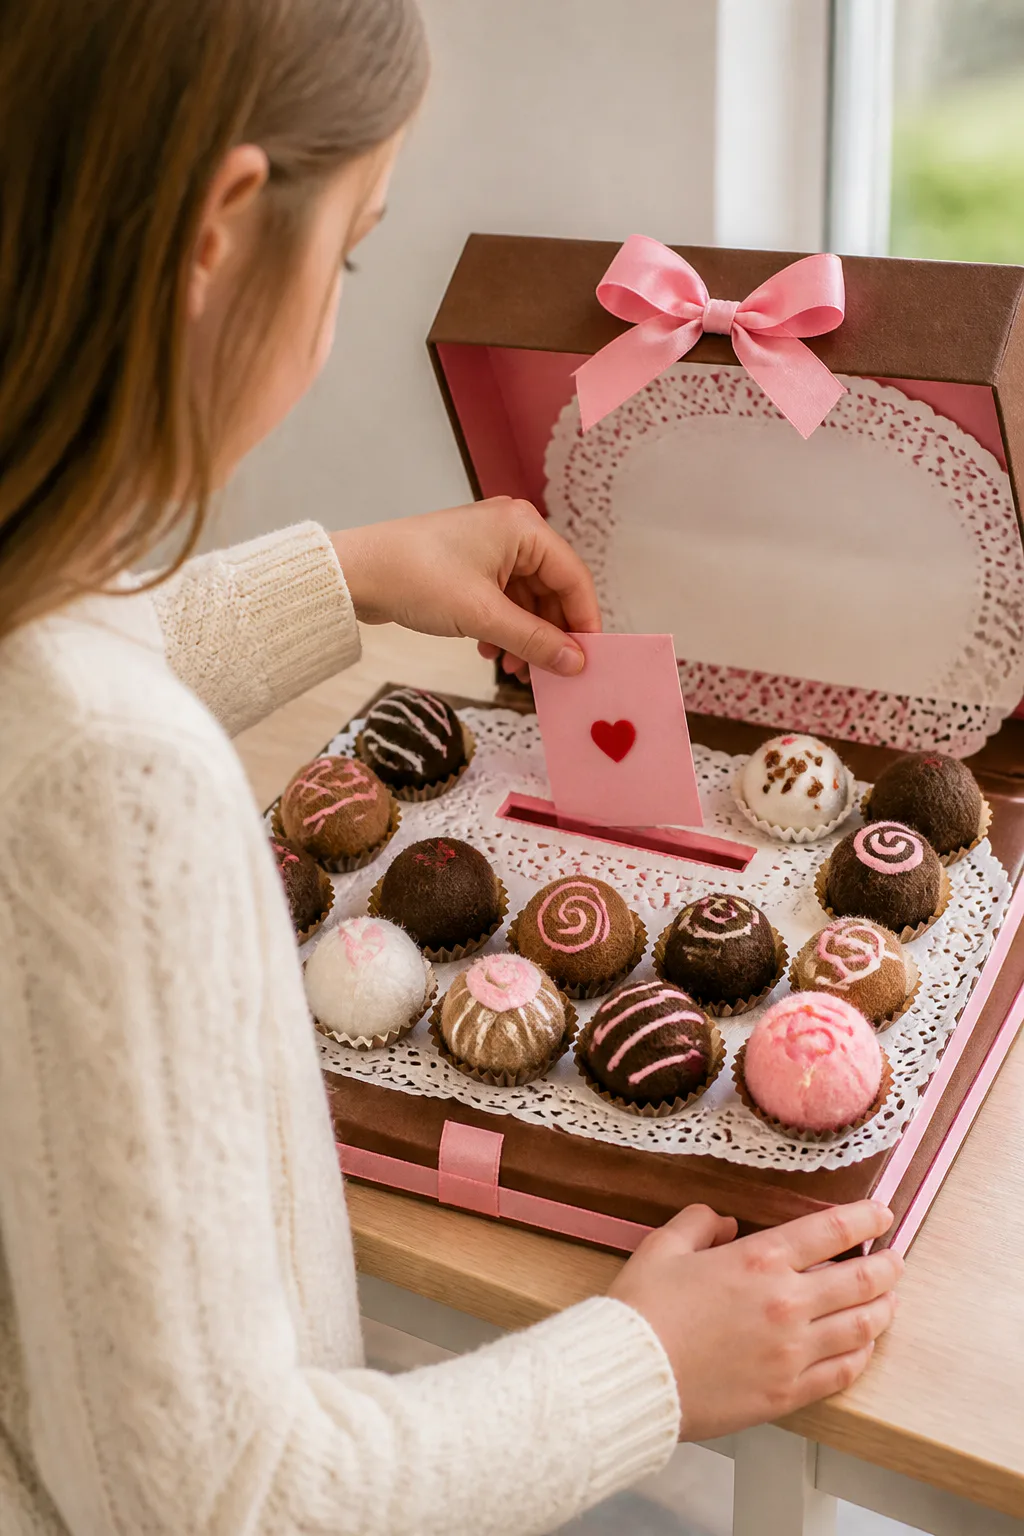
A shallow box with a lid can become a fancy-looking box of chocolates. Line the inside or top with paper lace doilies, then arrange oversized felt or fabric truffles to create a generous assortment of pretend sweets.
This idea suits a classic Valentine look and gives you a natural place to hide the card slot beneath a larger centerpiece. Make sure the opening is still obvious enough for classmates to use, even if it is surrounded by decorative chocolates.
Arrange the sweet details
Start by deciding which side will open for card collection, then position the truffles around that area. Use lightweight, firmly attached decorations so the shallow box stays easy to carry and its lid can still be lifted.
- Line the surface with doily shapes or lace-patterned paper.
- Make large truffles from felt, fabric, or paper-wrapped balls.
- Place one centerpiece near the slot without blocking it.
Contrasting colors and simple paper wrappers can make each pretend chocolate look different.
13. Stack Conversation Heart Boxes

Stack heart-shaped boxes in soft pastel colors to create a mailbox inspired by conversation hearts. Two or three boxes can form a tall, playful display, with each layer offering space for a short message or a different shade.
Before stacking, check that the boxes sit securely and that the finished shape will not wobble. The card slot can be placed in the uppermost box, while the sides become the perfect spot for familiar Valentine phrases.
Choose messages and colors
Paint or cover each box in a different pastel tone, then add words with stencils, letter stickers, or carefully drawn lettering. Short phrases are easiest to read from a distance and help the design keep its classic candy-heart feel.
- Try pastel pink, yellow, green, or lavender for the heart layers.
- Use short phrases such as “BE MINE” or “UR CUTE.”
- Secure the stack and leave the top opening clear for cards.
If separate heart boxes open individually, keep the retrieval lid easy to identify.
14. Turn a Box into a Retro TV
A rectangular box can become a vintage television with a painted screen, round knobs, and a simple antenna. The broad front panel gives you a clear canvas for a retro design, while the screen opening can double as the card slot.
This is a fun choice for kids who like old-fashioned gadgets or want a box that looks different from a typical mailbox. Use contrasting colors for the screen and controls so the television shape reads clearly even from across a room.
Make the screen the slot
Plan the opening before painting the screen border. An adult can cut the slot in the cardboard, then you can decorate around it with a drawn program, heart motif, or pretend picture while keeping the opening wide enough for cards.
- Paint a large screen shape on the front panel.
- Add paper or cardboard knobs beside the screen.
- Make an antenna from lightweight paper or pipe cleaners.
Keep the antenna simple and secure so it won’t bend easily when the box is moved.
15. Make a Minecraft Creeper or Chest Box
Turn a square box into a pixel-style game-inspired design using blocks of green or brown paper. A green Creeper face creates a recognizable character, while brown panels and dark trim can suggest a treasure chest instead.
The squared-off shape makes this a good project for anyone who enjoys arranging simple geometric pieces. Use the largest flat side for the face or chest details, and place the card slot on top so it does not interrupt the pixel design.
Build the blocky pattern
Cut paper into neat squares and lay out the pattern before gluing it down. For a Creeper, use darker green and black shapes to make a simple face; for a chest, add a band and a paper lock to the front.
- Cover the box in green or brown paper, depending on the design.
- Use square shapes to create a pixelated face or chest pattern.
- Keep the top slot clear and reinforce the box if needed.
Repeating square shapes gives the finished box a tidy, game-like appearance without requiring elaborate decoration.
16. Build a Hot Air Balloon Card Catcher

Create a whimsical balloon-and-basket display by suspending a decorated box beneath a paper lantern or painted ball. The box becomes the card-catching basket, while strings connect it to the rounded balloon above.
This design has a light, celebratory look that stands out from flat shoebox mailboxes. It works best when the top element is lightweight and the base is stable enough to hold cards without tipping or pulling the strings loose.
Balance the balloon and basket
Decorate the box and balloon separately, then attach them with evenly spaced strings. Keep the card slot in the basket easy to reach, and test the structure gently before adding decorations that could make the top too heavy.
- Use a paper lantern or a lightweight painted ball for the balloon.
- Connect the balloon and box with several pieces of string.
- Decorate the basket with hearts, stripes, or simple paper panels.
Set the finished catcher on a flat surface where the balloon can rise without getting snagged.
Final Thoughts
The best Valentine box is one that reflects its maker and has a clear, easy-to-use opening for cards. Whether you choose a fuzzy pet, a colorful creature, or a sweet treat, a simple container and a few thoughtful details can make the project feel personal.
Gather supplies you already have, choose a design that feels manageable, and leave time for paint or glue to dry. With a little planning, your finished mailbox can be both a fun craft and a cheerful part of the Valentine celebration.