16 Beautiful Christmas Wood Crafts Ideas
Christmas wood crafts bring natural texture and handmade charm to holiday decorating, and many of these ideas can be made with leftover lumber, simple craft supplies, or small pieces of wood. From cheerful tabletop figures to ornaments and practical seasonal accents, there’s a project here for different spaces and skill levels.
Some crafts involve cutting or drilling wood, while others rely on gluing, painting, and decorating pieces that are already prepared. Choose an approach that suits your tools and comfort level, and take time to sand rough edges before adding paint or embellishments.
Whether you’re making decorations with family, creating a thoughtful handmade gift, or adding a rustic touch to your own home, these Christmas wood crafts offer plenty of ways to personalize the season. Use the ideas as a starting point, then adjust colors, sizes, and details to fit your holiday style.
1. Make a Family of Scrap Wood Snowmen

Turn short pieces of scrap lumber into a friendly snowman family for a mantel, entry table, or sheltered porch. Cut blocks in varied heights so the finished figures feel like a group, then sand the edges and paint each one white. Their simple shapes are easy to decorate, making this a welcoming project for a relaxed afternoon of crafting.
Give each snowman a little personality with a painted face, an orange triangle nose, and a strip of fabric tied around the neck. Different scarf patterns or button details can suggest individual characters without making the set feel busy. Keep the palette coordinated if you want the collection to look polished together.
How to make them your own
Plan the faces before painting so the features sit at a similar height across the blocks. Once the paint is dry, attach scarves securely and add a small hat or painted buttons if you like.
- Choose three or more block heights for a family effect.
- Use leftover fabric for scarves with varied colors and patterns.
- Place the finished snowmen together on a tray or mantel.
2. Build a Mini Jenga Block Nativity
A mini nativity made from tumbling-tower blocks offers a simple, modern take on a familiar holiday display. Arrange and glue the blocks into a small manger and a few minimal figures for Mary, Joseph, and Baby Jesus. The clean wooden shapes keep the scene understated, so it can fit on a bookshelf, desk, or the center of a small holiday display.
You can leave the blocks natural for a pale wood finish or use a limited palette of paint to distinguish the figures. Small pieces of fabric or paper can add a touch of color without overwhelming the miniature scale. Before gluing, test the arrangement on a flat surface to see how the pieces balance.
Building a stable little scene
Use craft glue suitable for wood and allow each joined part to dry before assembling the next. Keep the figures broad and simple, since tiny details can be difficult to attach neatly.
- Sort the blocks first to find pieces with clean, even edges.
- Sketch a basic layout so the manger and figures fit together.
- Add small painted faces or fabric accents after assembly.
3. Paint Personalized Wood Slice Ornaments

Wood slice ornaments bring the look of natural grain to a Christmas tree, wreath, or wrapped gift. Small branch rounds make handy canvases for snowflakes, reindeer, simple trees, or a family name. Their organic edges add rustic character, while a painted design gives each one a personal touch.
For hanging, make a small hole near the top before decorating, then thread through twine or ribbon once the ornament is finished. If you are preparing the slices yourself, work carefully with suitable tools and smooth the surface and edges. Ready-made rounds are another option when you want to focus on painting rather than cutting.
Decorating the rounds
Keep the design scaled to the available space: a few well-placed marks often look clearer than a crowded illustration. Let paint dry fully before adding names or hanging cord.
- Try snowflakes, reindeer silhouettes, or a small evergreen motif.
- Use a fine brush or paint pen for names and delicate lines.
- Tie on twine for a natural look or ribbon for a brighter finish.
4. Stack Scrap Wood into Christmas Trees
Layered scrap wood can become a sturdy little Christmas tree for a mantel, shelf, or tabletop. Cut lumber offcuts into progressively shorter pieces and arrange them in a tiered triangle, then glue the layers together. The shape reads clearly as a tree even when the details are minimal, making it a useful project for decorating with materials already on hand.
Paint the finished tree green, white, or another color that suits your room. A small wooden star at the top creates a classic finishing touch, while a natural finish lets the grain stand out. Make a few trees in different heights and group them together for a simple woodland-inspired display.
Getting the tiered shape right
Lay out the pieces before gluing so each level steps inward evenly. If cutting the lumber, use appropriate tools and protect the work surface; sanding the cut edges helps the finished tree look tidy.
- Use shorter lengths for each successive tier.
- Choose one paint color for a calm, coordinated group.
- Add a wooden star or a small painted topper.
5. String a Cinnamon Wood Bead Garland

A garland of unfinished wooden beads and cinnamon sticks adds natural texture to a Christmas tree, mantel, or shelf. The wood keeps the decoration visually light, while cinnamon sticks bring a warm seasonal detail. Twine ties the materials together and suits the rustic, handmade look.
Vary the pattern to create a rhythm rather than threading every bead in one uninterrupted stretch. For example, add a cinnamon stick between groups of beads, or leave small sections of twine visible. A longer strand can drape across a mantel, while a shorter one works as a tree accent or a finishing touch around a wrapped package.
Choosing a simple pattern
Arrange the beads and cinnamon sticks on a table before threading to preview the spacing. Secure the ends with knots that are large enough to keep the beads from slipping off.
- Use unfinished beads for a natural, pale wood effect.
- Alternate bead clusters with cinnamon sticks for visual balance.
- Measure the display area before cutting the twine.
6. Craft Reindeer from Wood Slices
A wood slice reindeer makes a playful ornament or small decoration for a holiday table. Use a medium round as the face, then add twig antlers, googly eyes, and a bright red pom-pom nose. The combination of natural wood and lively details gives the craft an approachable look that works well in a casual family decorating scheme.
Choose a round with a smooth front and enough room for the face without crowding the edges. Twigs can be different shapes, so test their placement before attaching them; a balanced pair makes the reindeer easy to recognize. If you want to hang the finished piece, add a cord at the back once the other parts are secure.
Assembling the face
Use a suitable craft adhesive and let each attachment set before moving the reindeer. Keep small loose pieces away from young children, and adapt the details to the intended display and household.
- Pick twig antlers with a similar visual weight on both sides.
- Position the eyes before gluing to check the expression.
- Use a red pom-pom for a bright focal point.
7. Wrap Wooden Blocks as Christmas Gifts
Square wood blocks can become decorative presents that last season after season. Paint each block in a festive color or cover it with a piece of leftover wrapping paper, then add a ribbon bow. These pretend gifts look sweet beneath a small tree, on a mantel, or gathered in a bowl as part of a tabletop display.
Because the blocks have firm edges, they are easy to stack and arrange in groups. Combine different sizes or use a coordinated color scheme to keep the display cohesive. Painted versions are durable for repeated use, while paper-wrapped blocks offer a way to reuse attractive scraps from previous celebrations.
Finishing the gift effect
Wrap paper smoothly around the block and fold the corners neatly, or paint the block and let it dry before adding ribbon. If you plan to store the decorations, make sure any adhesive is fully set first.
- Use contrasting ribbon so it stands out against the block.
- Mix a few sizes for a layered present display.
- Coordinate the colors with nearby ornaments or textiles.
8. Hang Oversized Wooden Stick Snowflakes

Oversized wooden snowflakes bring a graphic winter shape to a wall, door, or sheltered porch. Glue craft sticks or narrow wooden shims into a six-point pattern, using a central crossing point to keep the design recognizable. A larger scale makes the simple geometry noticeable without requiring lots of small decorations.
Paint the snowflake white or silver for a crisp seasonal finish, or leave some wood visible for a more natural look. A light touch of glitter can catch the light, but the shape is striking even without extra sparkle. Make sure the finished piece has enough room around it so the points are not crowded by other wall decor.
Making a balanced snowflake
Arrange the sticks on a flat surface first, checking that the arms extend evenly from the center. Glue the intersections securely and let the piece dry flat before painting or adding a hanging loop.
- Use matching stick lengths for a symmetrical design.
- Choose white, silver, or natural wood to suit the room.
- Add a hanging loop to the back after the glue has set.
9. Stencil a Holiday Phrase on Pallet Wood
A reclaimed pallet board can become a rustic holiday sign for an entryway, mantel, or gallery wall. Stencil a short phrase such as “Joy,” “Noel,” or “Merry” onto the wood, letting the grain and weathered surface provide visual character. The straightforward design makes the sign easy to coordinate with greenery, candles, and other seasonal decorations.
Choose a board that feels sturdy and has a surface suitable for painting. Clean it and smooth any rough spots before placing the stencil. A contrasting paint color improves readability, while a softer tone can make the sign blend more gently into a neutral room.
Getting a neat stencil
Position the lettering before painting so the phrase sits centered on the board. Apply paint carefully around the stencil edges and lift it once the design is ready, following the paint’s drying guidance.
- Pick a short phrase that fits the board’s proportions.
- Use contrasting lettering for an easy-to-read sign.
- Check reclaimed wood for loose splinters before decorating.
10. Make Clothespin Angel Ornaments

Wooden clothespins make simple bodies for small angel ornaments that can hang on a Christmas tree or be added to a gift. A bead forms the head, while folded paper or lace creates wings at the back. The natural materials keep the angels lightweight and give them a handmade look that suits both rustic and traditional decorations.
Keep the details minimal so the small scale remains clear. A painted face, a loop of thread for hanging, or a small halo can finish the figure without making it feel cluttered. If making these with children, prepare the pieces ahead of time and let them choose colors and wing materials.
Putting the angel together
Attach the bead securely to the top of the clothespin, then position the wings behind the body. Wait for adhesive to dry before adding a hanging loop or placing the ornament on a branch.
- Use lace or folded paper for lightweight wings.
- Choose a bead size that suits the clothespin body.
- Add a simple thread loop for hanging on the tree.
11. Create Festive Wooden Stocking Hangers

A wooden stocking hanger adds a decorative touch to a mantel while providing a place to hang a holiday stocking. Shape a thick block into a tree, star, or house, then paint it to complement the room. Adding a sturdy metal hook to the front completes the practical part of the project.
Since the hanger needs to support a stocking, stability matters as much as appearance. A broad, flat base helps it sit securely on a shelf or mantel, and the hook should be attached firmly to the wood. Keep the decoration balanced so a painted shape or embellishment does not make the piece awkward to position.
Making a dependable hanger
Choose a block with a stable footprint and attach the hook according to its intended use. If cutting or drilling the wood, use appropriate tools and take care to keep the finished edges smooth.
- Pick a simple silhouette that can stand steadily.
- Use a sturdy hook suited to the hanger’s purpose.
- Paint and decorate the block before final placement.
12. Form a Wreath from Mini Wood Slices
Small wood rounds can be arranged into a compact wreath for a door, wall, or holiday shelf. Glue the slices into a circle, keeping their natural edges visible for a textured, woodland-inspired finish. A plaid bow at the top adds a familiar festive accent and provides a clear focal point.
Uniform slices make the circle easier to build, but slight differences in size can add a handmade feel. Lay them out before gluing and adjust the spacing until the shape looks balanced. A mini wreath works especially well in a smaller space where a full-size evergreen wreath might feel too large.
Shaping the wreath
Work on a flat surface and assemble the rounds gradually, checking that each one touches its neighbors. Let the adhesive dry thoroughly before attaching a ribbon loop or moving the wreath into place.
- Arrange the slices in a circle before committing to glue.
- Add a plaid bow for color and a soft contrast to the wood.
- Use a loop at the back if you want to hang the wreath.
13. Repurpose Spindles as Christmas Trees

Vintage chair or table spindles can become whimsical tabletop Christmas trees with very little added decoration. Mount each spindle on a small wooden base, then let its turned shape suggest the branches of a miniature tree. The finished pieces suit a mantel, shelf, or tiered display where their unusual silhouettes can stand out.
Keep the spindle natural for a warm wood accent, or paint it to fit your seasonal palette. A small star or simple coat of green paint can make the tree feel more explicitly festive, while leaving it undecorated highlights the spindle’s original form. Grouping several heights creates a little forest without taking up much room.
Giving an old spindle a new role
Check that the spindle and base are stable before displaying the piece. If the base needs an attachment, secure it carefully and let the join set; then add paint or a small topper if desired.
- Choose spindles with shapes that read clearly as tree-like.
- Use a solid base to help each piece stand upright.
- Group varied heights for a simple tabletop forest.
14. Shape a Whoville Scrap Wood Tree
A Whoville-inspired tree puts a playful twist on familiar Christmas greenery. Cut a curving tree silhouette from thin plywood, paint it lime green, and bend the tip over to create the distinctive whimsical shape. It makes a cheerful accent for a shelf, tabletop, or tiered tray where a little humor feels welcome.
Draw the outline on paper first so you can adjust the curve and proportions before transferring it to the wood. The tree does not need to be perfectly symmetrical; its leaning silhouette is part of the charm. A bright finish makes it stand out, while a small ornament or star can add a final festive detail.
Planning the curved silhouette
Use a stable piece of thin plywood and select a cutting method suited to your tools and experience. Sand the edges after cutting, then paint the shape and allow it to dry before placing it on display.
- Sketch a flowing outline before cutting the wood.
- Choose lime green for a lively, storybook-inspired look.
- Keep extra decorations simple so the curved tip stays visible.
15. Build Mini Popsicle Stick Sleds
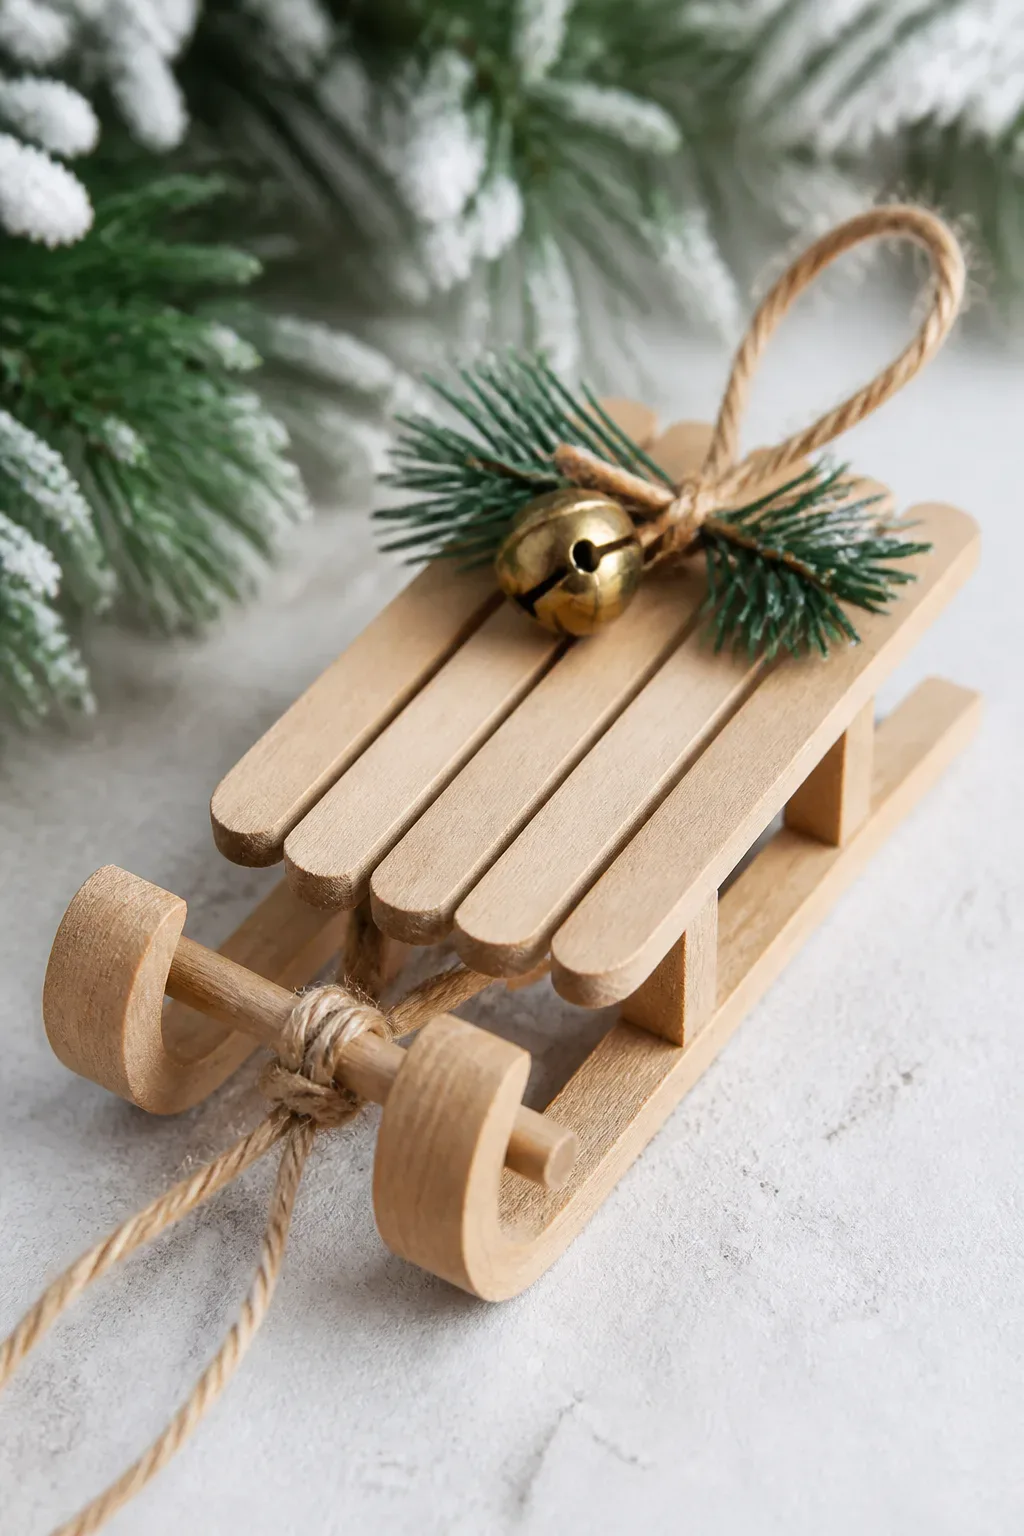
Mini sleds made from craft sticks have a nostalgic look and work as tree ornaments, shelf decorations, or small gift toppers. Arrange the sticks into a vintage-style toboggan shape, then glue them together and add a tiny bell or a sprig of faux pine. Their compact size makes them a handy project when you want to use simple materials for a detailed seasonal accent.
Before gluing, test the layout so the sled has a clear seat and runners. A natural wood finish keeps the design rustic, while paint can give it a brighter, more playful look. Add a hanging loop if you want the sled to go on the tree, or leave it as a tabletop decoration.
Assembling the little sled
Work on a flat surface and let each glued section set before adding the next. Keep the embellishments small so they suit the scale and do not hide the craft-stick construction.
- Arrange the sticks first to check the sled’s proportions.
- Add a small bell or faux pine as a finishing accent.
- Attach a cord loop if you plan to hang it as an ornament.
16. Burn Christmas Designs into Wood Coasters
Wood-burned coasters combine a useful everyday item with a personalized holiday design. Use a wood-burning tool to add simple trees, plaid-inspired lines, or a short seasonal greeting to round wood coasters. The natural grain remains part of the design, giving the finished set a warm look that can also make a thoughtful handmade gift.
Plan each motif before starting, especially if you want the coasters to feel like a coordinated set. Simple outlines are often easier to keep consistent across several pieces than detailed illustrations. Work in a suitable, well-ventilated area and follow the tool’s safety guidance, keeping hot equipment away from children and flammable materials.
Planning a safe, consistent design
Practice the pattern on a spare wood piece before working on the coasters. Let each one cool completely after burning, then check that the surface is clean and ready for its intended use.
- Choose a simple motif that fits the round surface.
- Test the design and tool handling on scrap wood first.
- Follow the wood-burning tool’s instructions and safety precautions.
Final Thoughts
These Christmas wood crafts range from simple painted blocks to more involved projects that use cutting, drilling, or wood-burning tools. You can choose one idea that suits the time and materials you have, or make a small collection that brings a consistent handmade feel to your holiday decor.
Personal details—a favorite color, a family name, a fabric scrap, or a familiar seasonal phrase—can make even a simple wood project feel special. Start with a manageable design, work safely, and enjoy creating decorations that can return to your home year after year.