13 Clever DIY Valentine’s Day Decorations Ideas
Valentine’s Day decorating can be as simple as adding a few handmade details to the spaces you already use. These DIY ideas bring in classic shades of red, pink, and cream, but they also leave room for vintage paper, soft greenery, and personal keepsakes.
Choose a project based on where you want a little extra color: the front door, a mantel, a bookshelf, or the dining table. Many of these decorations use easy-to-find materials, and several can be adapted with supplies you already have at home.
This list is for anyone who wants a cozy, personal Valentine’s display without making the whole room feel overdone. Whether you enjoy paper crafts, simple sewing, or painting, you’ll find options for different skill levels and decorating styles.
1. Make a Textured Yarn-Wrapped Heart Wreath
A yarn-wrapped heart wreath gives a front door or entryway a welcoming Valentine’s touch. The yarn adds soft texture, while a heart-shaped base keeps the project easy to recognize and easy to customize. Try pink, red, and cream for a traditional palette, or choose muted shades to suit a calmer space.
Because the wreath is lightweight, it can also hang on an interior door, above a console table, or on a gallery wall. A small cluster of felt flowers or pom-poms adds a focal point without covering up the yarn’s cozy, layered look.
How to pull it off
Start with a cardboard or wire heart form and wrap the yarn snugly, overlapping each pass to hide the base. Secure the ends at the back, then attach embellishments with craft glue or hot glue.
- Use two or three yarn colors for gentle contrast.
- Place flowers or pom-poms in one corner rather than all around.
- Add a ribbon loop that matches your door hardware or room accents.
A handmade wreath can make a small seasonal statement before guests even step inside.
2. Hang a Floating Heart Photo Garland
A floating heart photo garland combines Valentine’s color with memories that feel personal to your household. Paper hearts create a playful backdrop, while favorite photos and short notes give the display a more meaningful, collected quality. Hang it across a mantel, above a desk, or along a bedroom wall.
You can string the garland on twine for a relaxed look or attach it to fairy lights for a soft evening glow. Keep the arrangement loose and varied so the hearts, pictures, and messages feel like a cheerful collection rather than a perfectly repeated pattern.
Design tips
Cut hearts from cardstock in a few sizes, then use mini clothespins to attach photos and notes. Leave space between pieces so the garland hangs naturally and doesn’t become too heavy in one spot.
- Mix solid-color hearts with patterned paper.
- Include short notes, favorite phrases, or handwritten memories.
- Use removable hooks to avoid damaging the wall or mantel.
The best part is how easily you can refresh it with new photos or messages each year.
3. Style Conversation Heart Mason Jar Vases
Conversation heart mason jar vases bring a familiar candy-inspired look to a kitchen counter, dining table, or mantel. Pastel paint gives the jars a soft seasonal color, and hand-painted phrases make each one feel like a playful nod to classic Valentine treats. Grouping several jars together can create a simple centerpiece.
Use the jars to hold faux roses, small bunches of flowers, or tealights, depending on the look you want. If you plan to use them with real flowers, keep the inside clear and put the painted finish on the exterior so the jars remain practical as vases.
Make the lettering stand out
Wash and dry the jars before painting, and let each coat dry fully before adding words. A fine paintbrush or paint pen can help with short messages, especially on curved glass.
- Choose pastel pink, mint, yellow, and blue for a candy-like palette.
- Try phrases such as “BE MINE” or “CALL ME.”
- Group jars in odd numbers or vary their heights for a relaxed display.
These jars work especially well when their colors echo other accents in the room.
4. Frame Pressed Flowers for a Romantic Mantel
Pressed flowers between glass panes make a romantic display that feels more botanical than boldly themed. Dried roses, baby’s breath, and pink petals bring delicate color to a mantel, bedside table, or shelf. A floating frame lets the flowers remain visible from both sides, so the arrangement feels light rather than boxed in.
Think of the flowers as a small composition: a few larger blooms can anchor the design, while petals and tiny stems fill in the open spaces. Leaving some clear glass around the edges helps the arrangement feel intentional and gives each botanical detail room to show.
Arrange the flowers
Lay out the dried pieces before placing them between the glass panes. Once you like the balance, assemble the frame according to its design and choose a spot away from busy patterns that might compete with the delicate shapes.
- Combine rose petals with smaller flowers for varied scale.
- Keep the palette to a few related tones for a calm look.
- Use a stable frame stand or secure the piece safely on the wall.
This display can stay up beyond Valentine’s Day as a gentle touch of spring-inspired decor.
5. Create an Origami Heart Window Banner
An origami heart banner adds movement and a little dimension to a window, headboard, or doorway. Folding each heart gives the paper a sculptural shape, so the decoration looks lively when viewed from different angles. Pink and red are classic choices, while a few pale or patterned papers can soften the overall effect.
Threading the hearts onto gold floss adds a delicate metallic detail without overwhelming the paper. In a window, the banner can catch natural light; above a bed or desk, it creates a cheerful focal line that doesn’t take up valuable surface space.
Fold and hang with care
Practice the fold with a scrap piece first, then make a batch of hearts in coordinated paper. Space them along the floss before hanging so you can adjust the balance and avoid crowding the ends.
- Alternate paper colors to create a gentle rhythm.
- Leave enough floss at each end for tying or hanging.
- Use lightweight paper so the banner drapes neatly.
A row of dimensional hearts can brighten a room while keeping the rest of the decor simple.
6. Arrange Vintage Book Page Paper Roses

Paper roses made from old book or sheet music pages bring a nostalgic note to Valentine’s decor. Their softly curled edges look lovely in a small bouquet on a bookshelf, mantel, or dining table. The printed paper gives every flower a slightly different pattern, so even a simple arrangement feels layered and distinctive.
This project is a good fit for a romantic or vintage-inspired room, especially when paired with a plain vase that lets the paper details stand out. You can make the roses from pages you already have, or choose paper with a print that suits the colors and mood of your space.
Shape the petals
Cut petal or heart shapes from the paper, then curl the edges gently around a pencil. Layer and secure the pieces until the flower looks full, adjusting the curls as needed to create a natural, open bloom.
- Mix book pages with sheet music for subtle variation.
- Make several flowers in similar sizes for a cohesive bouquet.
- Arrange the stems at different heights for a relaxed silhouette.
The finished roses offer a lasting alternative to fresh flowers and a charming handmade detail.
7. Make Glitter-Dipped Candle Votives
Glitter-dipped votives add sparkle to a Valentine’s tablescape without requiring a complicated centerpiece. Decorating only the lower portion of each glass holder leaves room for the candlelight to shine through while giving the table a festive shimmer. A few votives can sit together on a dining table, mantel, or sideboard.
Choose one glitter color for a polished look, or mix red, silver, and rose gold for a more playful arrangement. The shine pairs nicely with plain dishes and linens, so the candles can provide the main seasonal accent without making the table feel crowded.
Keep the finish tidy
Apply decoupage glue to the lower half of a clean votive holder, then roll that area in glitter. Let the finish dry completely before placing a candle inside, and keep glitter away from the opening where the flame will sit.
- Mark a level boundary with painter’s tape before applying glue.
- Use a tray or sheet of paper to catch excess glitter.
- Group holders of different heights for a little visual variety.
Always use candles safely and keep the finished votives on a stable, heat-safe surface.
8. Hang a Felt Love Letter Wall Pocket
A felt love letter wall pocket is both decorative and useful. Shaped like an envelope, it brings a soft pop of color to a wall while holding a handwritten note, a few treats, or small flowers. Hang it near an entryway for a welcoming detail or beside a desk where you can tuck in messages and keepsakes.
Felt is easy to cut and doesn’t fray like many woven fabrics, making this a practical project for beginners. A dowel at the top gives the pocket a finished look and makes it simple to hang, while contrasting felt details can suggest a stamp or envelope flap.
Build the pocket
Cut felt into an envelope shape, then stitch or glue the sides and bottom, leaving the top open. Add a separate flap or decorative heart before attaching the pocket to a dowel with a loop of cord.
- Use sturdy felt so the pocket keeps its shape.
- Choose contrasting colors for the flap and envelope body.
- Keep heavier items out to prevent the pocket from sagging.
It’s a sweet way to give love notes a visible place in your seasonal decor.
9. Build a Boxwood and Felt Heart Topiary
A boxwood and felt heart topiary gives a tabletop a compact, garden-inspired Valentine accent. A greenery-covered heart sits atop a small dowel, creating the look of a miniature tree that works on a mantel, shelf, or entry table. Felt details bring in a bright heart shape while the greenery keeps the piece from feeling overly sweet.
Use faux greenery for a project that can be stored and brought out again, or add moss for a more natural texture. A small pot provides a stable base and gives you an opportunity to coordinate the decoration with other colors in the room.
Put the topiary together
Attach faux greenery or moss to a heart-shaped form, then secure the heart to a wooden dowel. Set the dowel into a small pot with a firm base so the finished piece stands upright on a flat surface.
- Cover the heart evenly, filling gaps around the edges.
- Choose a pot that is proportionate to the topper.
- Add a felt heart or ribbon as a small finishing accent.
This little topiary can anchor a group of smaller decorations without taking over the display.
10. Decorate a Painted Branch Love Tree
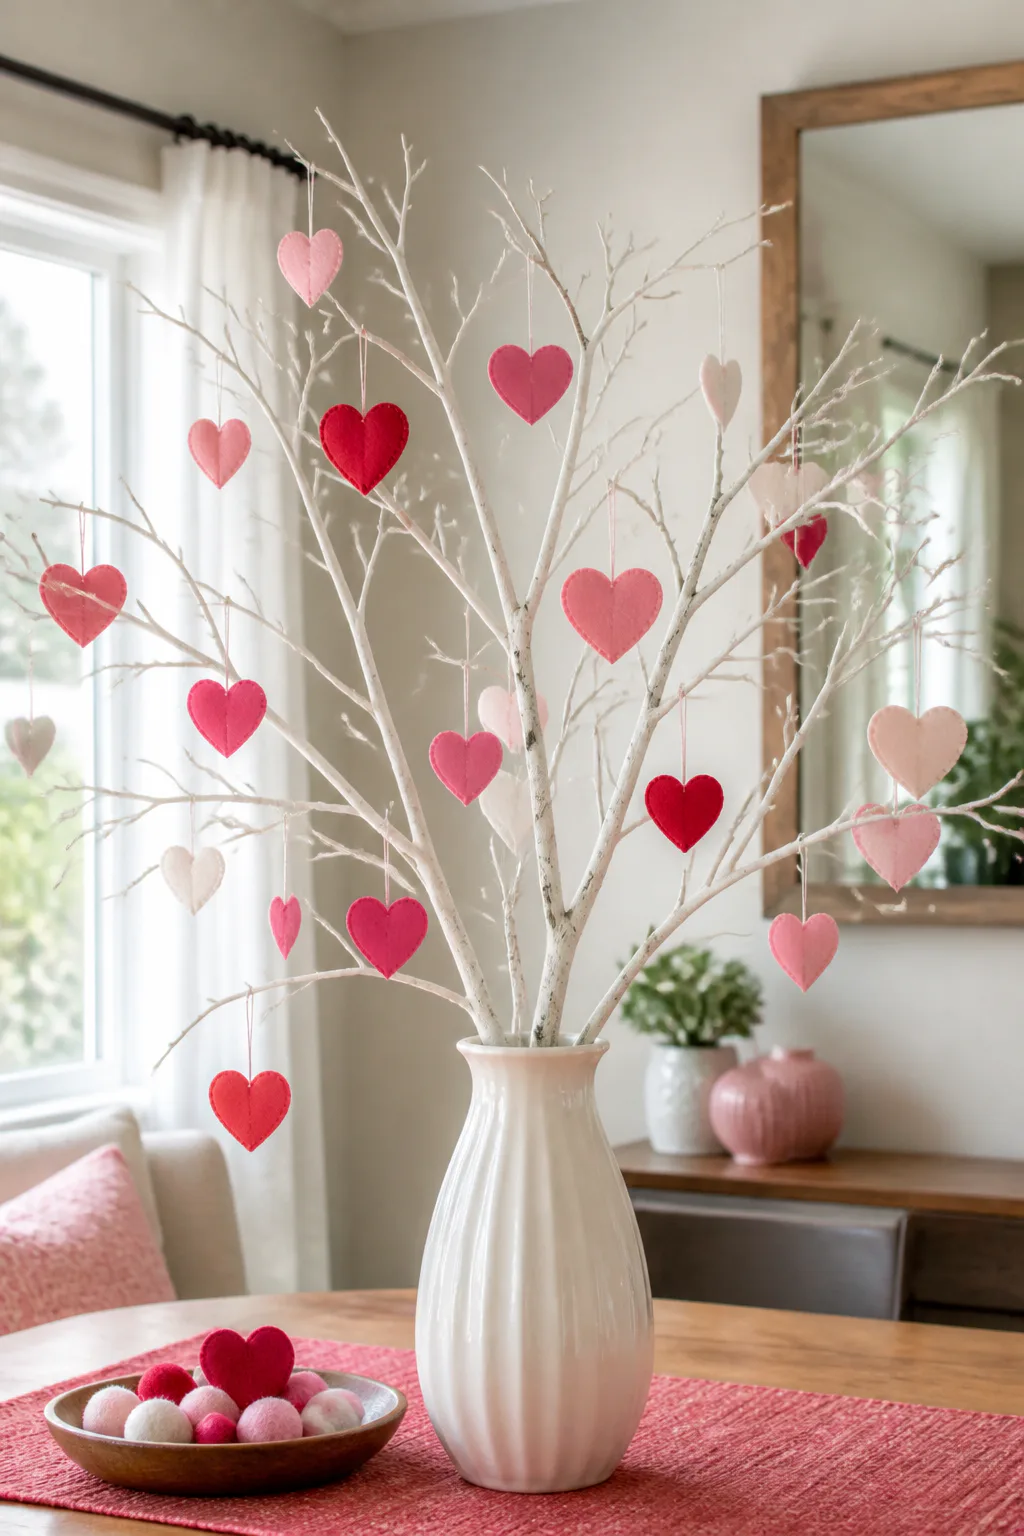
A painted branch love tree turns a few bare branches into a striking seasonal display. Place them in a vase and hang small paper or felt hearts from the twigs to create an airy centerpiece for a dining table or console. The open branches add height while leaving the space around them visually uncluttered.
White or gold paint gives the branches a fresh, decorative finish, but you can choose a color that suits your room. The hanging hearts are easy to change, making this a flexible project for different shades, messages, or craft styles as Valentine’s Day approaches.
Balance the branches
Select branches with several sturdy twigs, paint them, and let them dry before arranging them in a vase. Make sure the vase is stable enough to support the branches, then hang lightweight decorations at varied heights.
- Use a few branches rather than overcrowding the vase.
- Cut hearts in different sizes for a natural rhythm.
- Keep ornaments light so they don’t bend the smaller twigs.
The finished arrangement adds height and seasonal color without needing a large centerpiece.
11. Create an XO Marquee Bookshelf Display

An XO marquee display brings a bright, playful touch to a bookshelf, entry table, or mantel. Cardboard letters spelling “XOXO” or “LOVE” provide a bold shape, while small battery-operated lights add a warm glow. The letters can stand alone or sit beside framed photos and other small Valentine accents.
Because the display is made from lightweight materials, it’s easy to position on a shelf without making a permanent change to the room. Keep the surrounding decor fairly simple so the illuminated letters remain the focal point, especially in the evening.
Shape and light the letters
Arrange cardboard letter cutouts on a flat surface and wrap them with battery-operated light strings. Secure the wire neatly at the back, and keep the battery pack accessible so you can switch the lights on and off.
- Choose letters with a shape that is easy to wrap.
- Space the lights evenly for a balanced glow.
- Check that the letters sit securely before placing them on a shelf.
This project makes a cheerful accent for a small area that could use a little seasonal shine.
12. Scatter Painted Heart River Rocks
Painted river rocks are a simple way to add tiny Valentine details to a tabletop. Smooth stones can become miniature canvases for hearts, polka dots, or short messages, and their natural shapes bring an earthy contrast to bright seasonal colors. Scatter them along a mantel or use them as napkin weights at a dinner table.
Since each stone is different, a collection looks charming without needing every design to match. Keep the artwork small and simple so it’s easy to see, and choose colors that connect with your other decorations rather than introducing a whole new palette.
Paint a small collection
Clean and dry the stones before decorating them with acrylic paint markers. Let the designs dry completely, then arrange the rocks in small groups or place one at each setting for a thoughtful table accent.
- Choose smooth stones that sit steadily on a surface.
- Repeat a few colors to make varied designs feel coordinated.
- Add short words or tiny motifs that are easy to read.
These petite accents are easy to move around as you adjust the rest of your display.
13. Make an Ombré Paper Strip Wreath
An ombré paper strip wreath creates a bold, dimensional focal point for a door or interior wall. Paper loops in shades that move from deep crimson to soft blush give the wreath a sense of depth, while the repeated shapes make it feel full and lively. It’s a good choice when you want one larger decoration to carry the Valentine theme.
The gradual color transition can be subtle or dramatic, depending on how many shades you use. Hang the wreath where its circular shape has room to stand out, such as above a console table or on a plain stretch of wall.
Build the color transition
Cut paper strips, fold or loop each one, and attach them around a circular base. Work through the shades in order, checking the arrangement as you go so the color shift feels smooth rather than sharply divided.
- Use several related shades for an even gradient.
- Keep the loops similar in size for a cohesive shape.
- Fluff and adjust the paper to fill any visible gaps.
The finished wreath adds a cheerful burst of color while still feeling handmade and personal.
Final Thoughts
Small handmade details can make Valentine’s Day feel special without requiring a full room makeover. A wreath can welcome guests, a garland can showcase favorite memories, and a few painted accents can bring color to a table or shelf.
Choose one project that fits your space and the time you have, then personalize the colors and materials to suit your home. The most inviting decorations are often the ones that feel like yours, whether they’re carefully crafted or charmingly simple.